tappay-iOS-example(Swift)
TapPay SDK Example Code for iOS Plateform.
TapPay iOS SDK is used to get token(i.e. prime) on iOS platform for charging a credit card.
Obtain your app id and keys here. > https://www.tappaysdk.com/en
Demo

Usage
Direct Pay
1. Import TPDirect.framework and TPDirectResource into your project.
2. Create a Bridging-Header.h file and Import TPDirect SDK
#import <TPDirect/TPDirect.h>
3. Use TPDSetup to set up your environment.
func application(_ application: UIApplication, didFinishLaunchingWithOptions launchOptions: [UIApplicationLaunchOptionsKey: Any]?) -> Bool {

    TPDSetup.setWithAppId(APP_ID, withAppKey: "APP_KEY", with: TPDServerType.ServerType)
}
4. Add UIView in your Main.storyboard and initialize TPDForm.
self.tpdForm = TPDForm.setup(withContainer: Your View)
5. Setup TPDForm Text Color
tpdForm.setErrorColor(UIColor.red)
tpdForm.setOkColor(UIColor.green)
tpdForm.setNormalColor(UIColor.black)
6. Setup TPDForm onFormUpdated Callback get TPDForm Status, check is can get prime.
tpdForm.onFormUpdated { (status) in
    if (status.isCanGetPrime()) {
        // Can make payment.
    } else {
        // Can't make payment.
    }
}
7. Setup TPDForm display ccv field
// Default is true.
tpdForm.setIsUsedCcv(true)
8. Use TPDForm to initialize TPDCard.
self.tpdCard = TPDCard.setup(self.tpdForm)
9. Use the getPrime() function in TPDCard to obtain the prime token.
tpdCard.onSuccessCallback { (prime, cardInfo, cardIdentifier) in

    print("Prime : \(prime!), cardInfo : \(cardInfo), cardIdentifier : \(cardIdentifier)")

}.onFailureCallback { (status, message) in

    print("status : \(status) , Message : \(message)")

}.getPrime()
Apple Pay
1. Download and import TPDirect.framework into your project.
2. Create a Bridging-Header.h file Import TPDirect SDK
#import <TPDirect/TPDirect.h>
3. Import PassKit.framework into your project.
import PassKit
4. Enable Apple Pay in your Xcode and add Apple Merchant IDs.
5. Use TPDSetup to set up your environment.
func application(_ application: UIApplication, didFinishLaunchingWithOptions launchOptions: [UIApplicationLaunchOptionsKey: Any]?) -> Bool {

    TPDSetup.setWithAppId(APP_ID, withAppKey: "APP_KEY", with: TPDServerType.ServerType)

}
6. Create TPDMerchant for Apple Pay Merchant Information.
7. Create TPDConsumer for Apple Pay Consumer Information.
According to isAmountPending setting to decide use deferred payment or not, default is false. According to isShowTotalAmount setting to decide Apple Pay total display amount or AMOUNT PENDING, default is true.
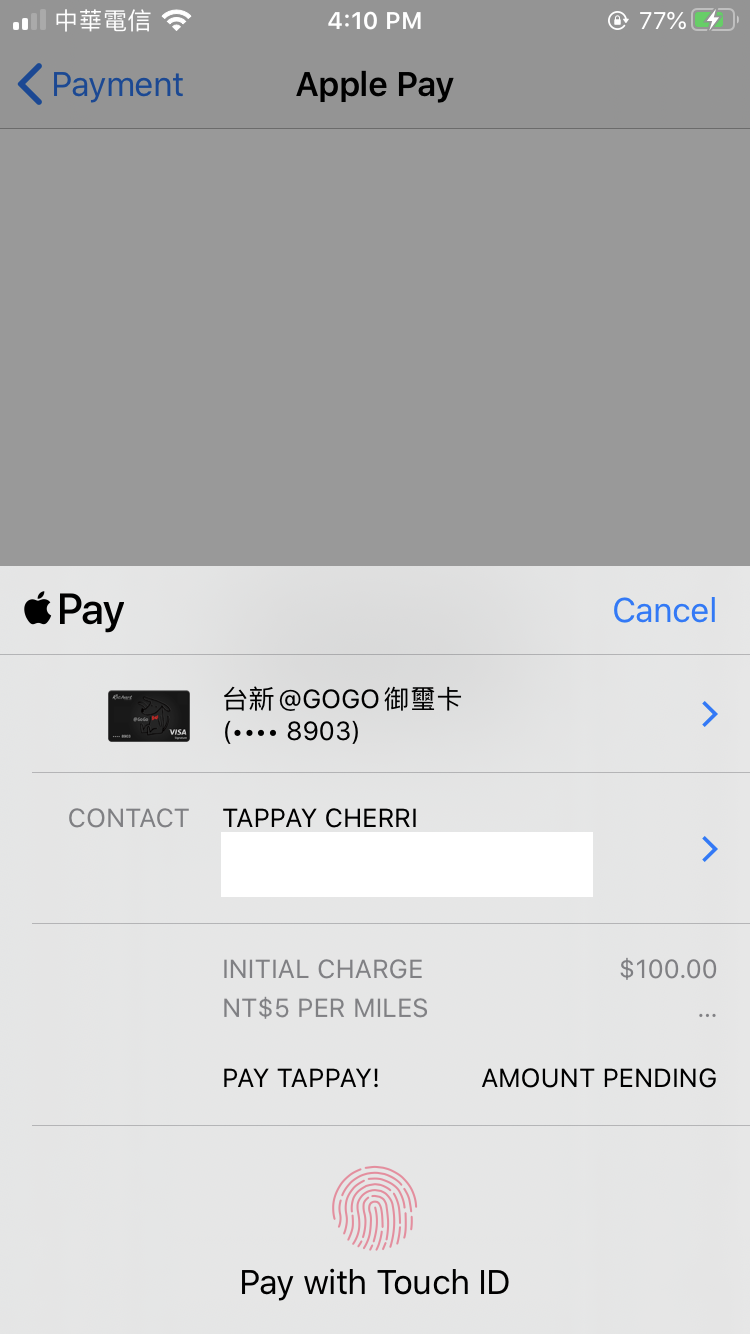
8. Create TPDCart for Apple Pay Cart Information.
9. Check Device Support Apple Pay.
TPDApplePay.canMakePayments()
10. Setup TPDApplePay with TPDMerchant, TPDConsumer and TPDCart.
TPDApplePay.setupWthMerchant(merchant, with: consumer, with: cart, withDelegate: self)
11. Start Payment.
applePay.startPayment()
12. Get Prime via delegate.
func tpdApplePay(_ applePay: TPDApplePay!, didReceivePrime prime: String!) {

    // 1. Send Your Prime To Your Server, And Handle Payment With Result

    print("Prime : \(prime!)");

    // 2. Handle Payment Result Success / Failure in Delegate.
    let paymentReault = true;
    applePay.showPaymentResult(paymentReault)

}
13. Handle Payment Success Result.
func tpdApplePay(_ applePay: TPDApplePay!, didSuccessPayment result: TPDTransactionResult!) {
    print("Apple Pay Did Success ==> Amount : \(result.amount.stringValue)")

    print("shippingContact.name : \(applePay.consumer.shippingContact?.name?.givenName) \( applePay.consumer.shippingContact?.name?.familyName)")
    print("shippingContact.emailAddress : \(applePay.consumer.shippingContact?.emailAddress)")
    print("shippingContact.phoneNumber : \(applePay.consumer.shippingContact?.phoneNumber?.stringValue)")

    print("Shipping Method.identifier : \(applePay.cart.shippingMethod.identifier)")
    print("Shipping Method.detail : \(applePay.cart.shippingMethod.detail)")

}
14. Handle Payment Failure Result.
func tpdApplePay(_ applePay: TPDApplePay!, didFailurePayment result: TPDTransactionResult!) {
    print("Apple Pay Did Failure ==> Message : \(result.message), ErrorCode : \(result.status)")
}
LINE Pay
1. Download and import TPDirect.framework into your project.
2. Create a Bridging-Header.h file Import TPDirect SDK
#import <TPDirect/TPDirect.h>
3. Linked Framework and Libraries add SafariServices.framework
4. Use TPDSetup to set up your environment.
func application(_ application: UIApplication, didFinishLaunchingWithOptions launchOptions: [UIApplicationLaunchOptionsKey: Any]?) -> Bool {

    TPDSetup.setWithAppId(APP_ID, withAppKey: "APP_KEY", with: TPDServerType.ServerType)

}
5. Setup Custom URL Scheme
Step 1
Go into your app’s info.plist file.
Step 2
Add a Row to this and call it “URL types”
Step 3
Expand the first item in “URL types” and add a row called “URL identifier”, the value of this string should be the reverse domain for your app e.g. “com.yourcompany.myapp”.
Step 4
Again, add a row into the first item in “URL types” and call it “URL Schemes”
Step 5
Inside “URL Schemes” you can use each item as a different url you wish to use, so if you wanted to use “myapp://” you would create an item called “myapp”.

6. Setup Whitelisting URL Scheme
Step 1
Open Info.plist
Step 2
Add a Key named LSApplicationQueriesSchemes, and set the type of the value to Array
Step 3
Add an item of type String to the Array and set its value to line.

Setup TPDLinePay
Use your custom URL Scheme to initialize TPDLinePay object.
TPDLinePay.setup(withReturnUrl: "You Custom URL SCheme")
isLinePayAvailable
Check current device can use LINE Pay.
TPDLinePay.isLinePayAvailable()
Install LINE App
TPDLinePay.installLineApp()
Get Prime
Call getPrime function, via onSuccessCallback or onFailureCallbac to get prime or error message.
linePay.onSuccessCallback { (prime) in
    print(prime : \(prime!))
}.onFailureCallback { (status, msg) in
    print("status : \(status), msg : \(msg)")
}.getPrime()
Redirect to LINE Pay Payment Page
Obtain payment_url from TapPay, call redirect url function to LINE Pay Payment Page, get LINE Pay result via callback.
linePay.redirect(with: paymentURL, viewController: self, completion: { (result) in

    print("stauts : \(result.status) , recTradeId : \(result.recTradeId) , bankTransactionId : \(result.bankTransactionId) , order_number : \(result.orderNumber)")

})
Handle URL
Use this method handle URL come from TapPay and parse URL data. ( For version higher than iOS 9.0 )
func application(_ app: UIApplication, open url: URL, options: [UIApplicationOpenURLOptionsKey : Any] = [:]) -> Bool {
    let tapPayHandled = TPDLinePay.handle(url)
    if (tapPayHandled) {
        return true
        }
    return false
}
( For version lower than iOS 9.0 )
func application(_ application: UIApplication, open url: URL, sourceApplication: String?, annotation: Any) -> Bool {
    let tapPayHandled = TPDLinePay.handle(url)
    if (tapPayHandled) {
        return true
    }

    return false
}
Exception Handle
Step1
Implement addExceptionOberver function in AppDelegate didFinishLaunchingWithOptions to handle exception, .
TPDLinePay.addExceptionObserver(#selector(tappayLinePayExceptionHandler(notofication:)))
Step2
In AppDelegate add tappayLinePayExceptionHandler function, when exception happened receive notification.
@objc func tappayLinePayExceptionHandler(notofication: Notification) {

let result : TPDLinePayResult = TPDLinePay.parseURL(notofication)

print("status : \(result.status) , orderNumber : \(result.orderNumber) , recTradeid : \(result.recTradeId) , bankTransactionId : \(result.bankTransactionId) ")

}
JKOPay
1. Download and import TPDirect.framework into your project.
2. Create a Bridging-Header.h file and Import TPDirect SDK
#import <TPDirect/TPDirect.h>
3. Use TPDSetup to set up your environment.
func application(_ application: UIApplication, didFinishLaunchingWithOptions launchOptions: [UIApplicationLaunchOptionsKey: Any]?) -> Bool {

    TPDSetup.setWithAppId(APP_ID, withAppKey: "APP_KEY", with: TPDServerType.ServerType)

}
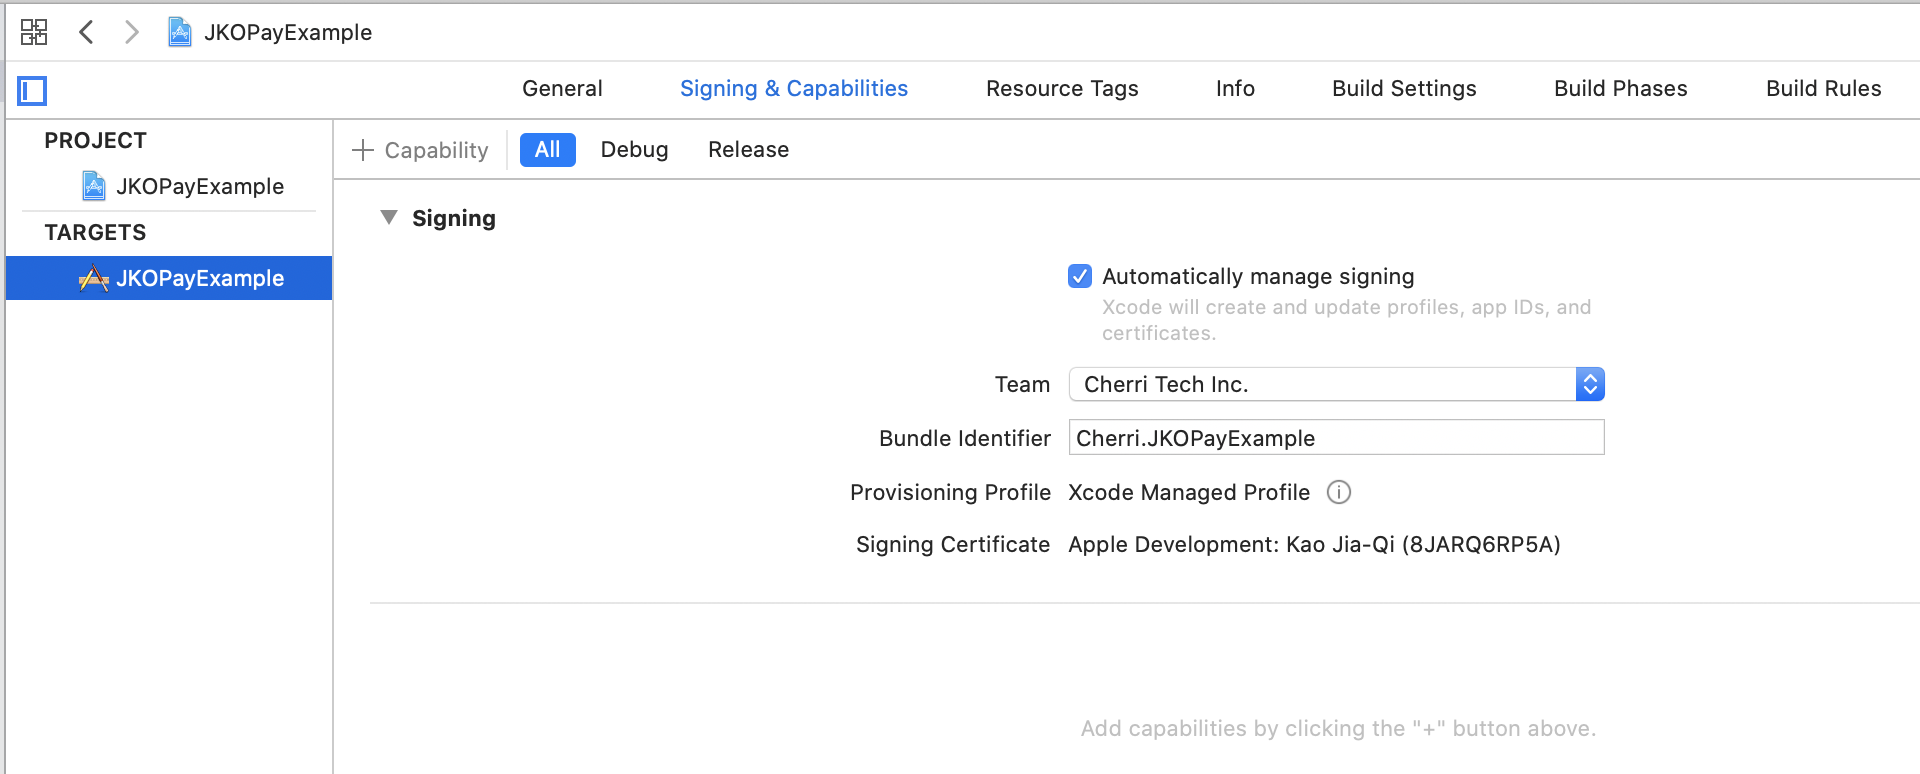
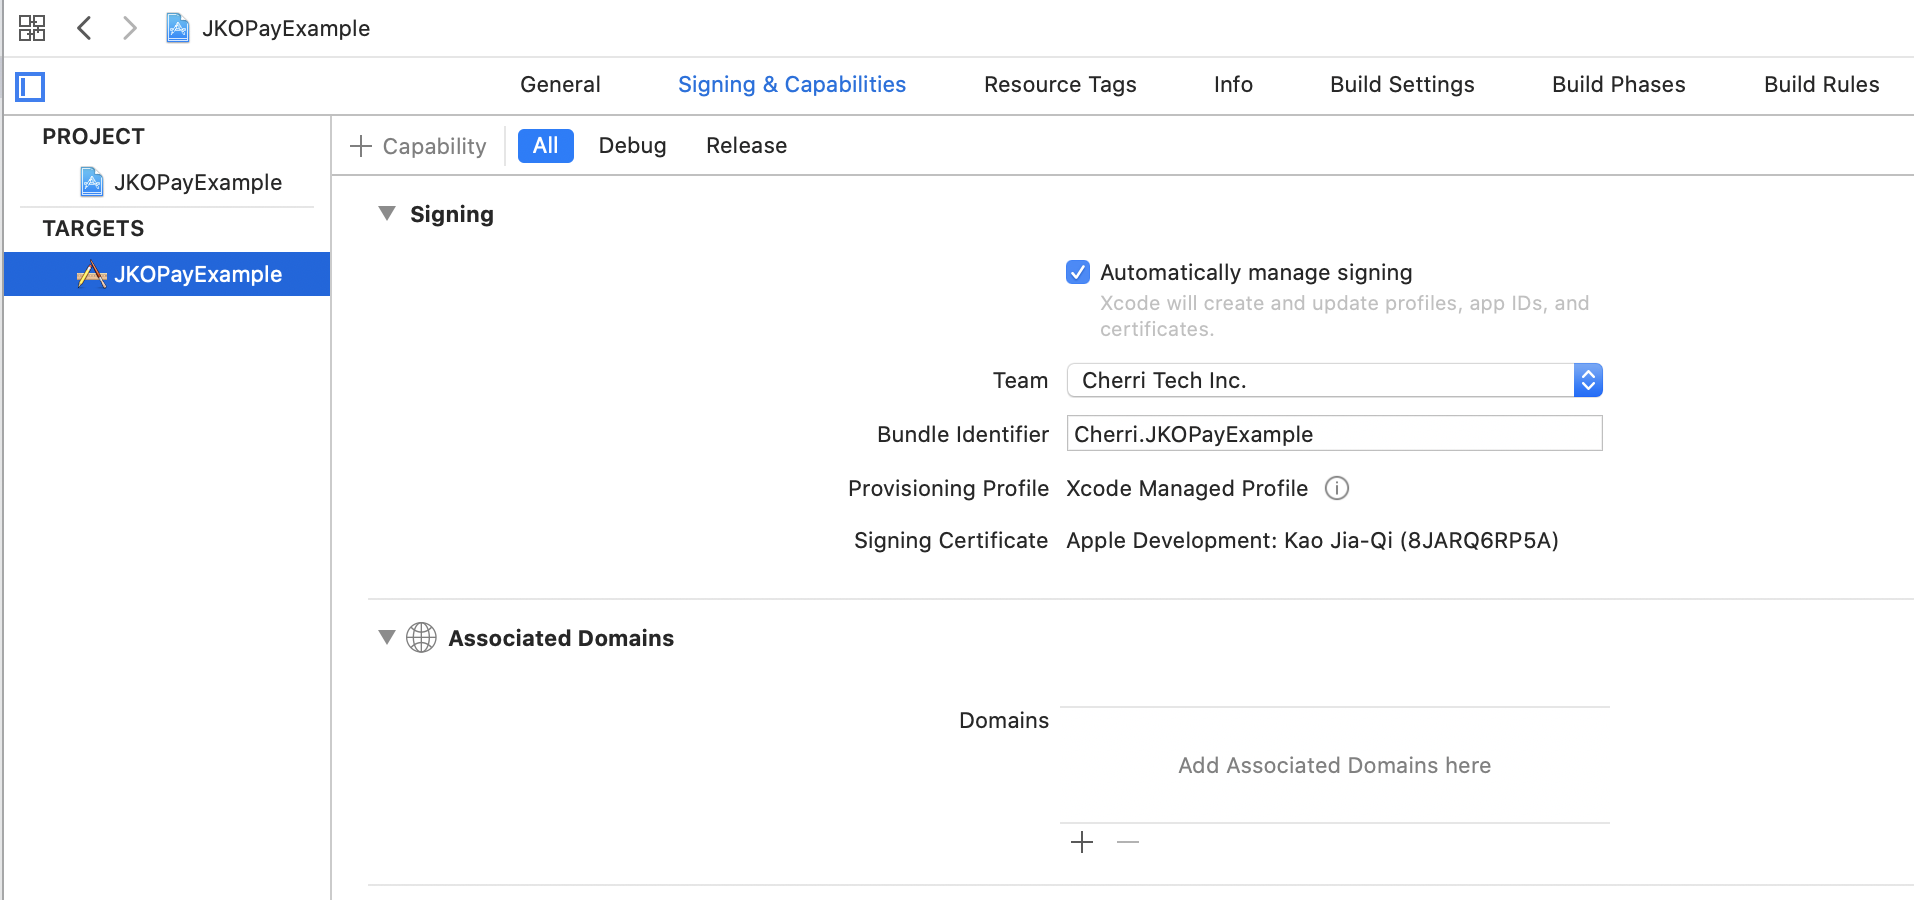
Setup universal link
step 1
Go to xCode TARGET and Signing & Capabilities page
step 2
click + button and choose Associated Domains

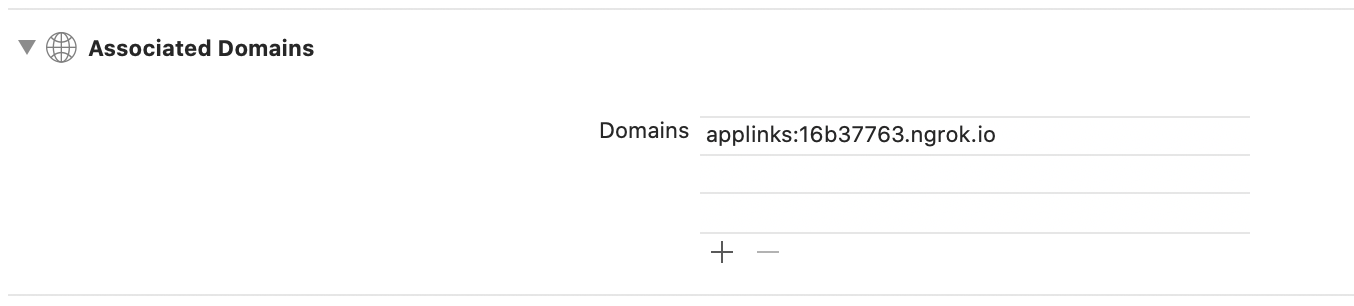
step 3
In Associated Domains section click + button add domain
step 4
Domain should be applink:{your domain without https://}
step 5
Setup a config need to upload a file on your server. You can use ngrok to test. create a folder /.well-known in your server then create a file ‘apple-app-site-association’
appID format :
{
    "applinks": {
        "apps": [],
        "details": [
            {
                "appID": "T9G64ZZGC4.Cherri.JKO-example",
                "paths": [ "*" ]
            }
        ]
    }
}
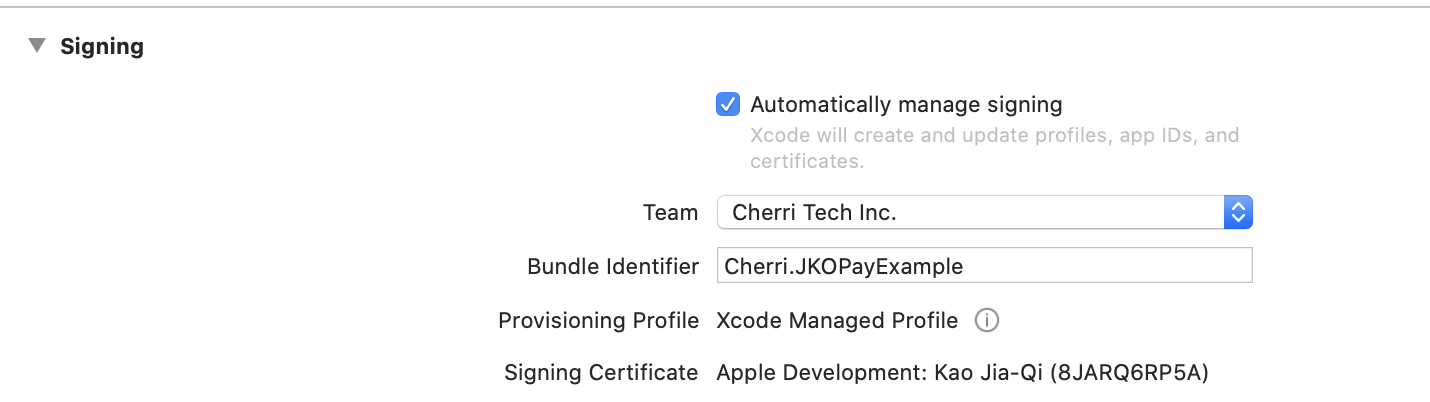
Get teamID from apple developer membership
Get bundle identifier from xCode
Setup TPDJKOPay
Use your custom universal link to initialize TPDJKOPay object.
let jkoPay = TPDJKOPay.setup(withReturnUrl: "Your universal link")
Get Prime
Call getPrime function, via onSuccessCallback or onFailureCallbac to get prime or error message.
jkoPay.onSuccessCallback { (prime) in
    print(prime : \(prime!))
}.onFailureCallback { (status, msg) in
    print("status : \(status), msg : \(msg)")
}.getPrime()
Redirect to JKOPay App
Obtain payment_url from TapPay, call redirect url function to JKOPay App, get JKOPay result via callback.
jkoPay.redirect(payment_url) { (result) in
    print("status : \(result.status), rec_trade_id : \(result.recTradeId), order_number : \(result.orderNumber), bank_transaction_id : \(result.bankTransactionId)")
}
Handle universal link
Use this method handle universal link come from TapPay and parse data. ( For version lower than iOS 13.0 )
- (BOOL)application:(UIApplication *)application continueUserActivity:(NSUserActivity *)userActivity restorationHandler:(void (^)(NSArray<id<UIUserActivityRestoring>> * _Nullable))restorationHandler {
    NSURL * url = userActivity.webpageURL;
    BOOL jkoHandled = [TPDJKOPay handleJKOUniversalLink:url];
    if (jkoHandled) {
        return YES;
    }
    return NO;
}
Exception handle
step1
Implement addExceptionOberver function in AppDelegate didFinishLaunchingWithOptions to handle exception.
TPDJKOPay.addExceptionObserver(#selector(tappayJKOPayExceptionHandler(notofication:)))
step2
In AppDelegate add tappayJKOPayExceptionHandler function, when exception happened receive notification.
func tappayJKOPayExceptionHandler(notofication: Notification) {

let result : TPDJKOPayResult = TPDJKOPay.parseURL(notofication)

print("status : \(result.status) , orderNumber : \(result.orderNumber) , recTradeid : \(result.recTradeId) , bankTransactionId : \(result.bankTransactionId) ")

}
Easy Wallet
1. Download and import TPDirect.framework into your project.
2. Create a Bridging-Header.h file and Import TPDirect SDK
#import <TPDirect/TPDirect.h>
3. Use TPDSetup to set up your environment.
func application(_ application: UIApplication, didFinishLaunchingWithOptions launchOptions: [UIApplicationLaunchOptionsKey: Any]?) -> Bool {

    TPDSetup.setWithAppId(APP_ID, withAppKey: "APP_KEY", with: TPDServerType.ServerType)

}
Setup universal link
step 1
Go to xCode TARGET and Signing & Capabilities page
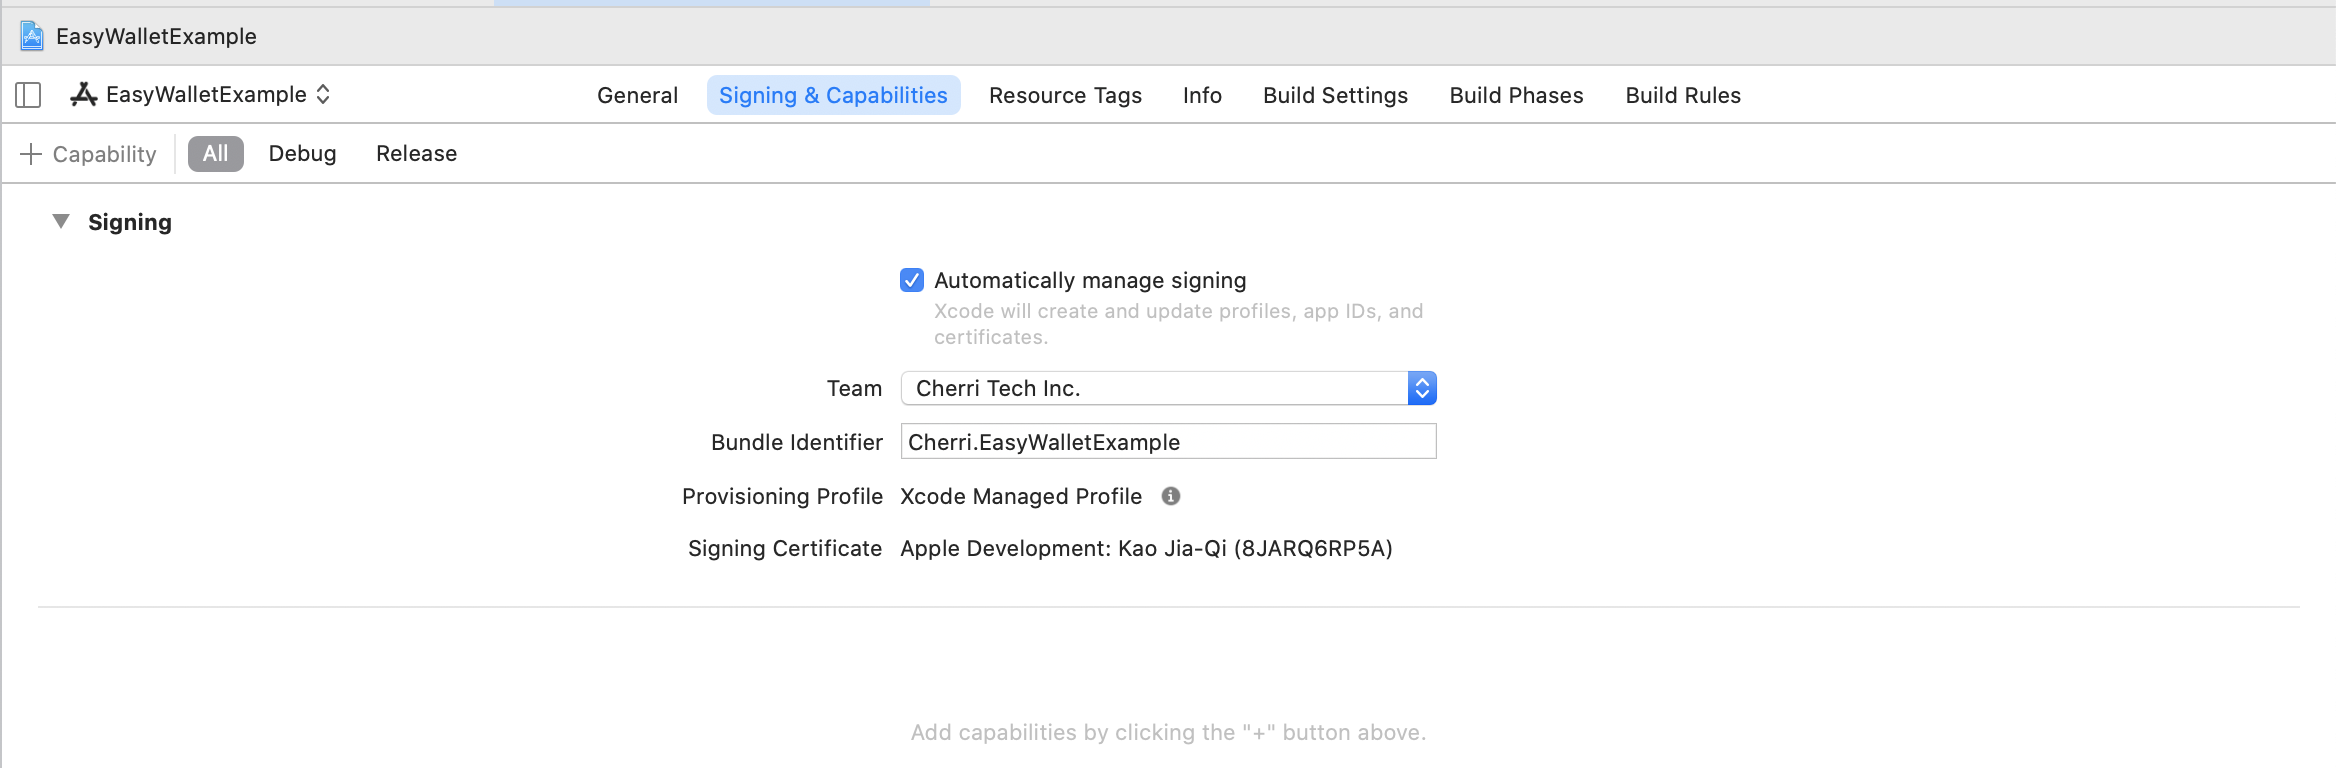
step 2
click + button and choose Associated Domains
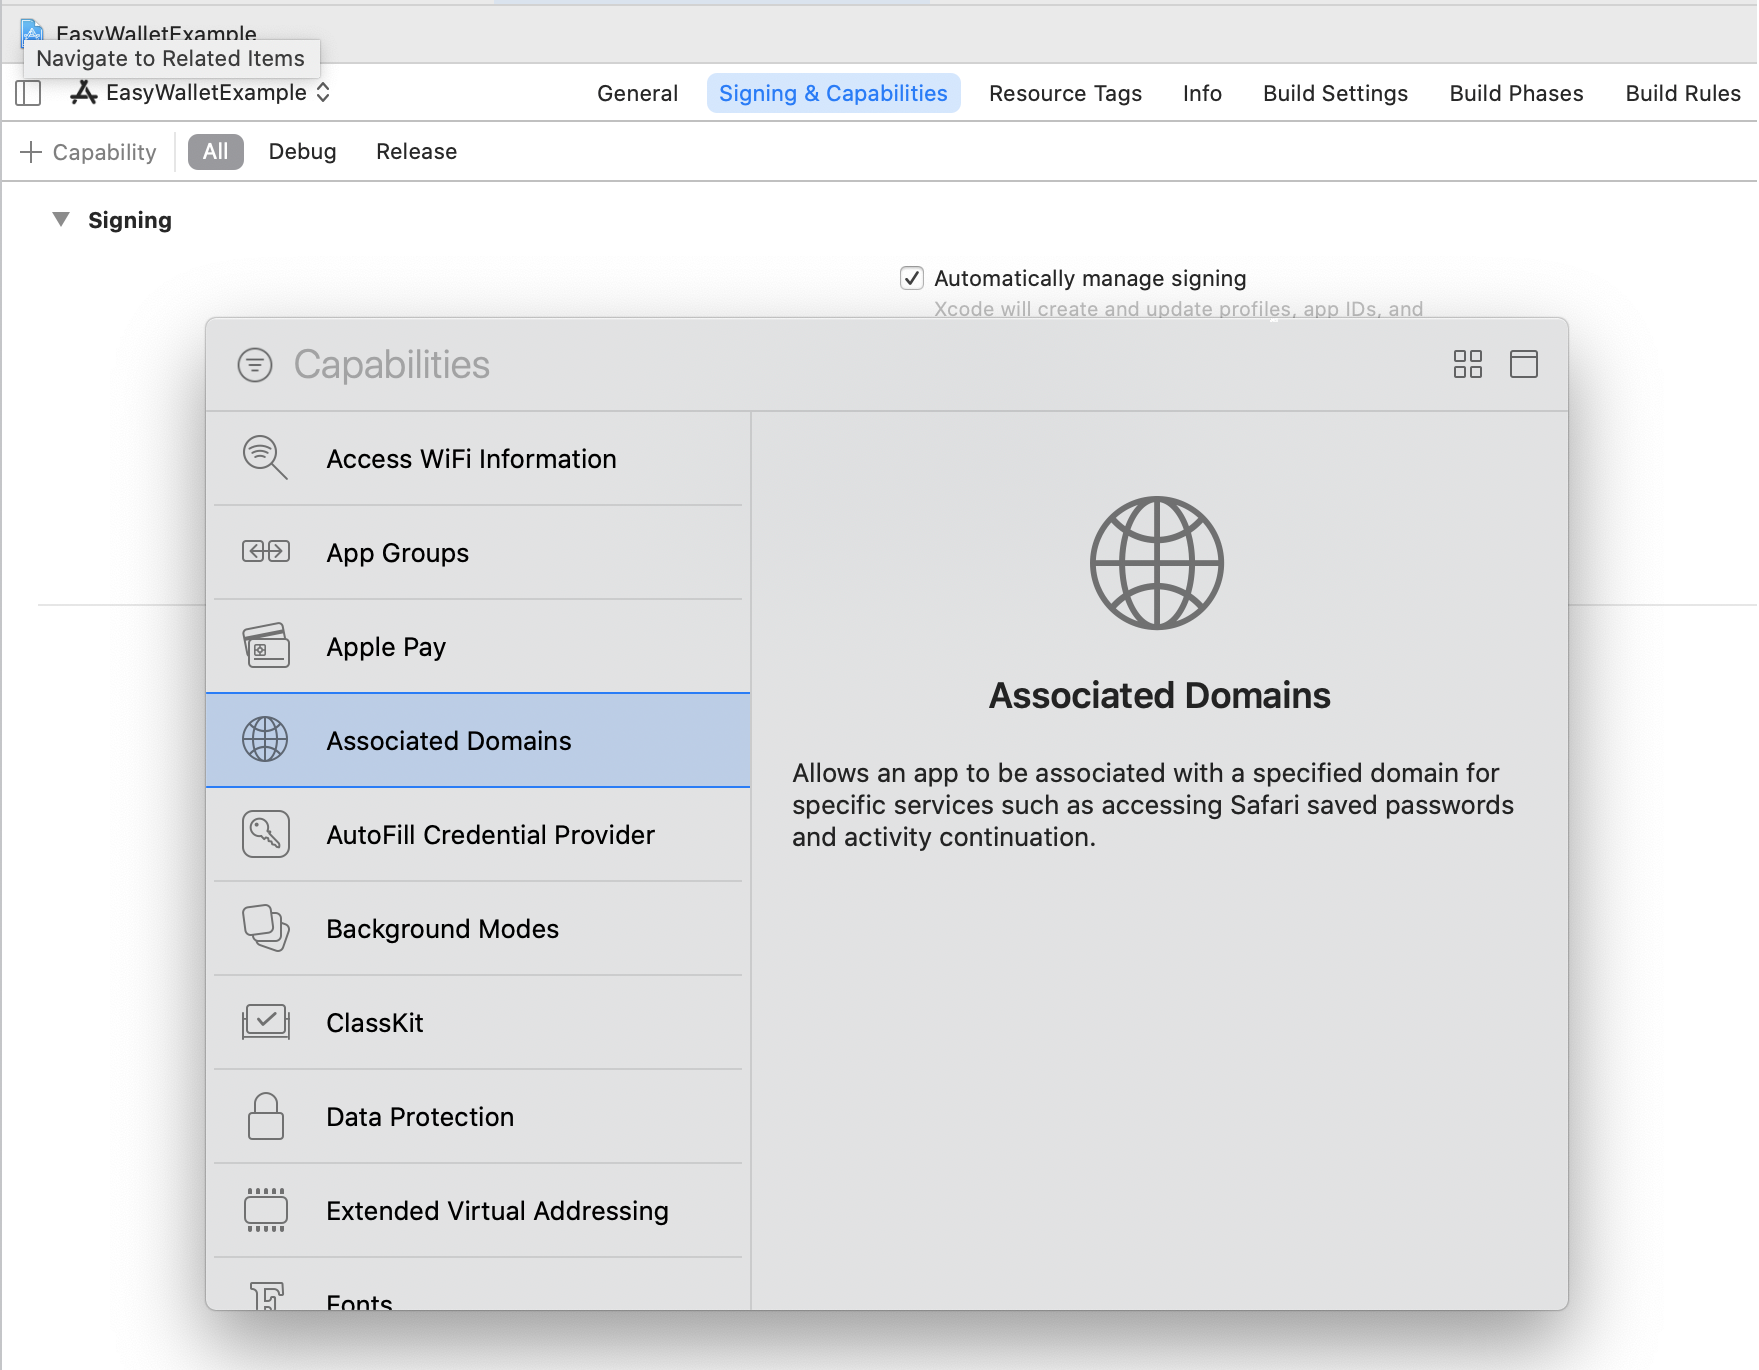
step 3
In Associated Domains section click + button add domain
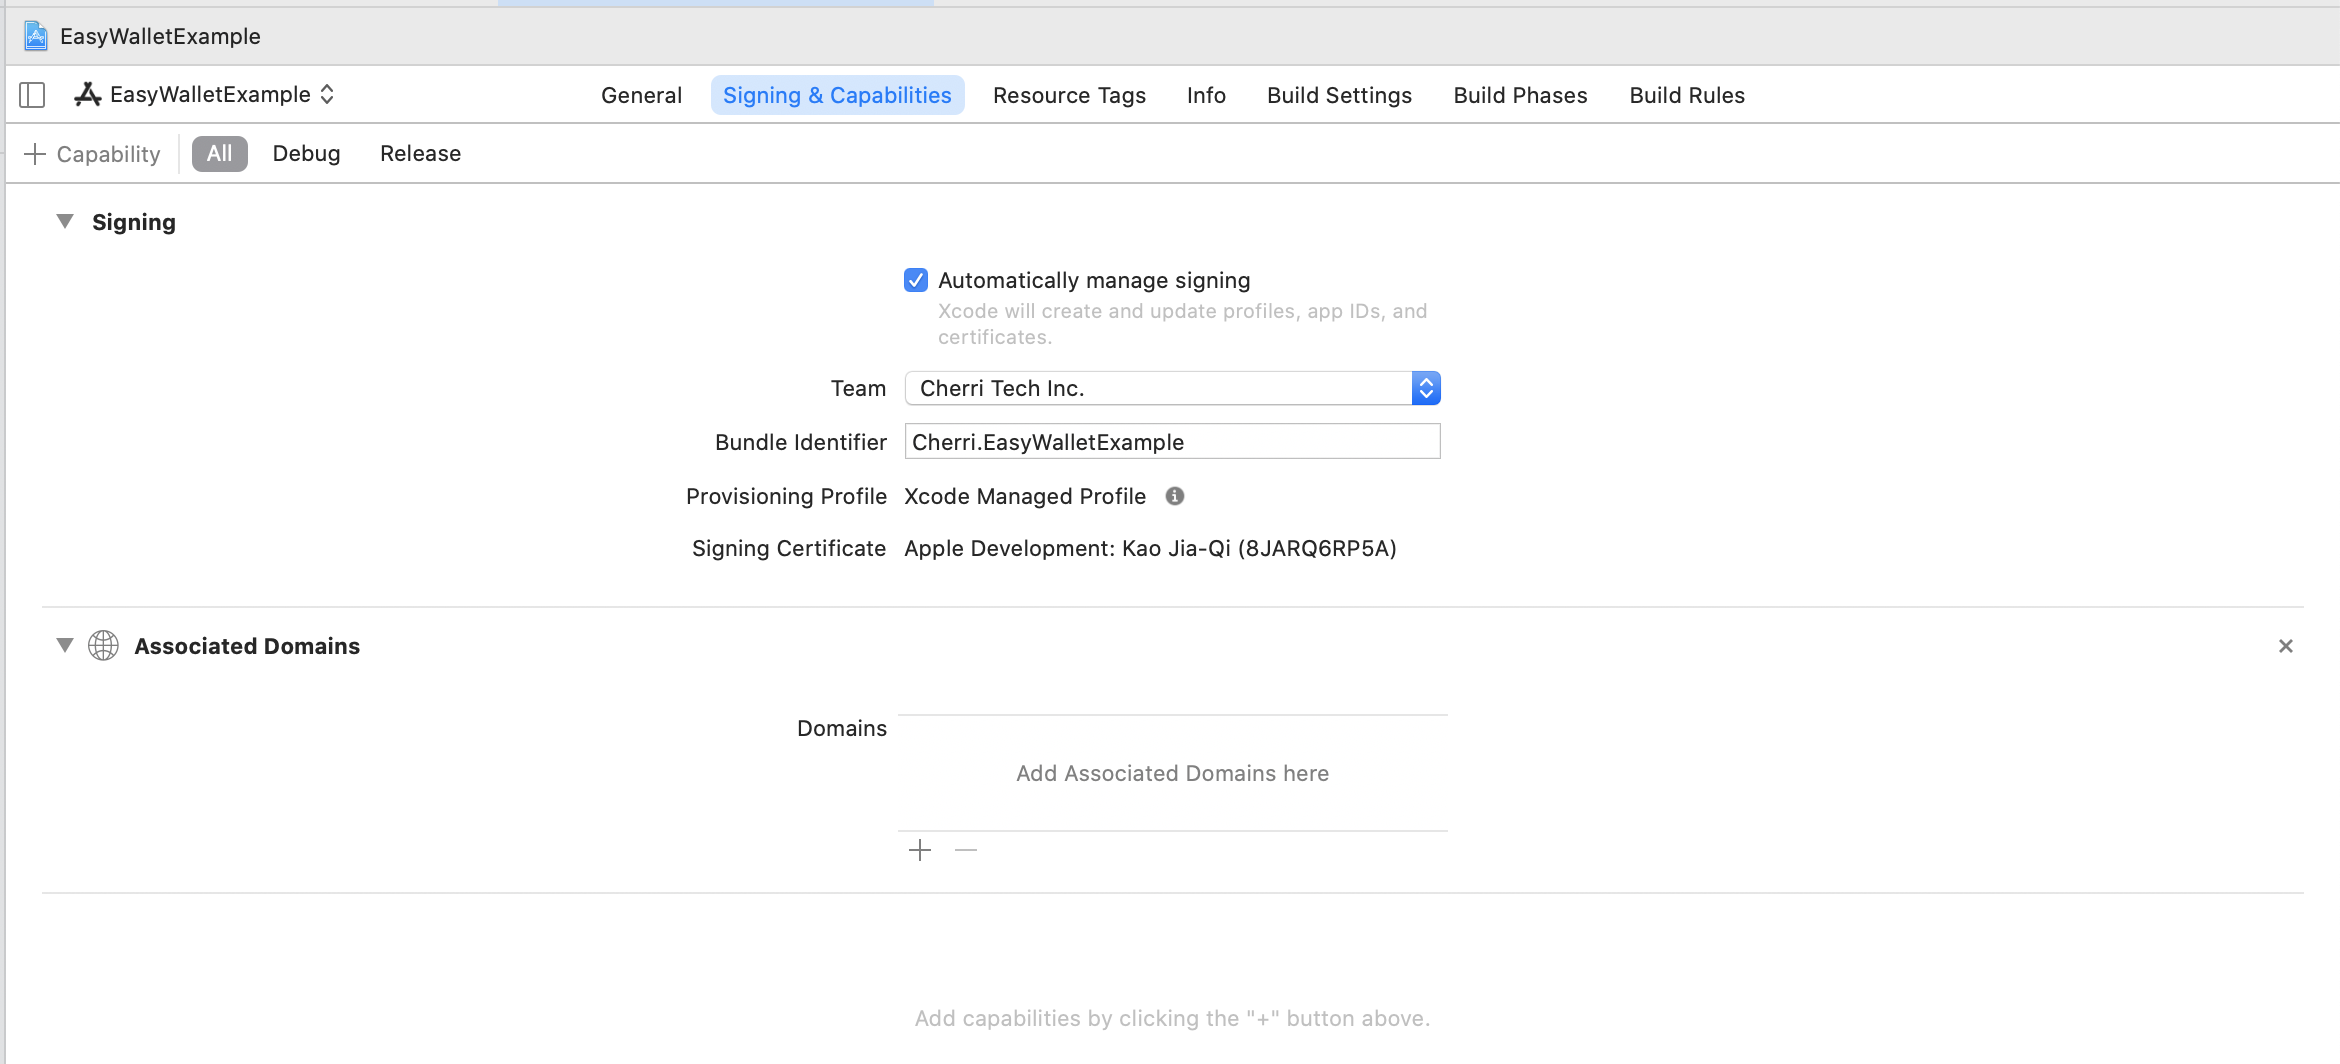
step 4
Domain should be applink:{your domain without https://}
step 5
Setup a config need to upload a file on your server. You can use ngrok to test. create a folder /.well-known in your server then create a file ‘apple-app-site-association’
appID format :
{
    "applinks": {
        "apps": [],
        "details": [
            {
                "appID": "T9G64ZZGC4.Cherri.EasyWalletExample",
                "paths": [ "*" ]
            }
        ]
    }
}
Get teamID from apple developer membership
Get bundle identifier from xCode
Setup TPDEasyWallet
Use your custom universal link to initialize TPDEasyWallet object.
let easyWallet = TPDEasyWallet.setup(withReturnUrl: "Your universal link")
Get Prime
Call getPrime function, via onSuccessCallback or onFailureCallbac to get prime or error message.
easyWallet.onSuccessCallback { (prime) in
    print(prime : \(prime!))
}.onFailureCallback { (status, msg) in
    print("status : \(status), msg : \(msg)")
}.getPrime()
Redirect to Easy Wallet App
Obtain payment_url from TapPay, call redirect url function to EasyWallet App, get EasyWallet result via callback.
easyWallet.redirect(payment_url) { (result) in
    print("status : \(result.status), rec_trade_id : \(result.recTradeId), order_number : \(result.orderNumber), bank_transaction_id : \(result.bankTransactionId)")
}
Handle universal link
Use this method handle universal link come from TapPay and parse data. ( For version lower than iOS 13.0 )
- (BOOL)application:(UIApplication *)application continueUserActivity:(NSUserActivity *)userActivity restorationHandler:(void (^)(NSArray<id<UIUserActivityRestoring>> * _Nullable))restorationHandler {
    NSURL * url = userActivity.webpageURL;
    BOOL easyWalletHandled = [TPDEasyWallet handleEasyWalletUniversalLink:url];
    if (easyWalletHandled) {
        return YES;
    }
    return NO;
}
Exception handle
step1
Implement addExceptionOberver function in AppDelegate didFinishLaunchingWithOptions to handle exception.
TPDEasyWallet.addExceptionObserver(#selector(tappayEasyWalletExceptionHandler(notofication:)))
step2
In AppDelegate add tappayEasyWalletExceptionHandler function, when exception happened receive notification.
func tappayEasyWalletExceptionHandler(notofication: Notification) {

let result : TPDEasyWalletResult = TPDEasyWallet.parseURL(notofication)

print("status : \(result.status) , orderNumber : \(result.orderNumber) , recTradeid : \(result.recTradeId) , bankTransactionId : \(result.bankTransactionId) ")

}
Direct Pay CCV Form
When using Pay by Card Token API, if you want to bring the ccv data which has been hashed to do transaction , you can use TPDCcv class getPrime() method to get the ccv_prime.
ps. ccv_prime is a random string. It can help you not to handling sensitive ccv data.
1. Setup CCV Form
Use this method to set display ccv field.
tpdCcvForm = TPDCcvForm.setupCCV(withContainer: ccvFormView)
2. Setup Card Type
This method can verify the ccv format for different card type. Ex: If this is a VISA card, we will check if the ccv length is three digits.
tpdCcvForm.setCCVForm(CardType.visa)
3. onCCVFormUpdated
Use this method to get the current status of ccv.
tpdCcvForm.onCCVFormUpdated { (status) in
  print("isCanGetCCVPrime : \(status!.isCanGetCCVPrime())")
}
Setup TPDCcv
Use this method to initial TPDCcv object.
tpdCcv = TPDCcv.setup(ccvForm: TPDCcvForm)
Get Prime
If calling getPrime() successfully, you will get prime from onSuccessCallback. If failed, you will get error code and error message from onFailureCallback.
tpdCcv.onSuccessCallback { (prime) in
    // Send ccv_prime to Pay by card token API
}.onFailureCallback { (status, message) in
    print("status : \(status), message : \(message)")
}.getPrime()
PiWallet
1. Download and import TPDirect.framework into your project.
2. Create a Bridging-Header.h file and Import TPDirect SDK
#import <TPDirect/TPDirect.h>
3. Use TPDSetup to set up your environment.
func application(_ application: UIApplication, didFinishLaunchingWithOptions launchOptions: [UIApplicationLaunchOptionsKey: Any]?) -> Bool {

    TPDSetup.setWithAppId(APP_ID, withAppKey: "APP_KEY", with: TPDServerType.ServerType)

}
Setup universal link
step 1
Go to xCode TARGET and Signing & Capabilities page
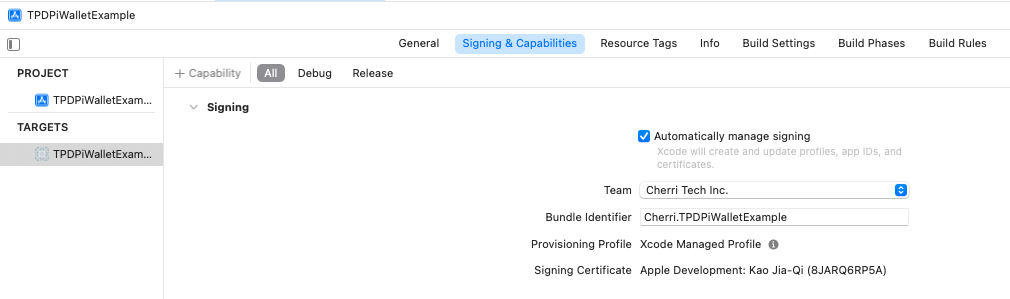
step 2
click + button and choose Associated Domains

step 3
In Associated Domains section click + button add domain
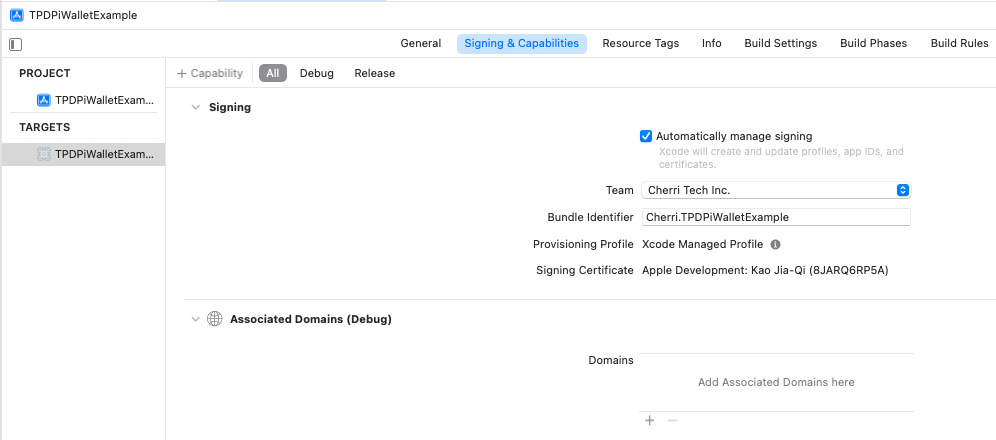
step 4
Domain should be applink:{your domain without https://}
step 5
Setup a config need to upload a file on your server. You can use ngrok to test. create a folder /.well-known in your server then create a file ‘apple-app-site-association’
appID format :
{
    "applinks": {
        "apps": [],
        "details": [
            {
                "appID": "T9G64ZZGC4.Cherri.TPDPiWalletExample",
                "paths": [ "*" ]
            }
        ]
    }
}
Get teamID from apple developer membership
Get bundle identifier from xCode
Setup TPDPiWallet
Use your custom universal link to initialize TPDPiWallet object.
let piWallet = TPDPiWallet.setup(withReturnUrl: "Your universal link")
Get Prime
Call getPrime function, via onSuccessCallback or onFailureCallbac to get prime or error message.
piWallet.onSuccessCallback { (prime) in
    print(prime : \(prime!))
}.onFailureCallback { (status, msg) in
    print("status : \(status), msg : \(msg)")
}.getPrime()
Redirect to PiWallet App
Obtain payment_url from TapPay, call redirect url function to PiWallet App, get PiWallet result via callback.
piWallet.redirect(payment_url) { (result) in
    print("status : \(result.status), rec_trade_id : \(result.recTradeId), order_number : \(result.orderNumber), bank_transaction_id : \(result.bankTransactionId)")
}
Handle universal link
Use this method handle universal link come from TapPay and parse data. ( For version lower than iOS 13.0 )
- (BOOL)application:(UIApplication *)application continueUserActivity:(NSUserActivity *)userActivity restorationHandler:(void (^)(NSArray<id<UIUserActivityRestoring>> * _Nullable))restorationHandler {
    NSURL * url = userActivity.webpageURL;
    BOOL piWalletHandled = [TPDPiWallet handlePiWalletUniversalLink:url];
    if (piWalletHandled) {
        return YES;
    }
    return NO;
}
Exception handle
step1
Implement addExceptionOberver function in AppDelegate didFinishLaunchingWithOptions to handle exception.
TPDPiWallet.addExceptionObserver(#selector(tappayPiWalletExceptionHandler(notofication:)))
step2
In AppDelegate add tappayPiWalletExceptionHandler function, when exception happened receive notification.
func tappayPiWalletExceptionHandler(notofication: Notification) {

let result : TPDPiWalletResult = TPDPiWallet.parseURL(notofication)

print("status : \(result.status) , orderNumber : \(result.orderNumber) , recTradeid : \(result.recTradeId) , bankTransactionId : \(result.bankTransactionId) ")

}
Plus Pay
1. Download and import TPDirect.framework into your project.
2. Create a Bridging-Header.h file and Import TPDirect SDK
#import <TPDirect/TPDirect.h>
3. Use TPDSetup to set up your environment.
func application(_ application: UIApplication, didFinishLaunchingWithOptions launchOptions: [UIApplicationLaunchOptionsKey: Any]?) -> Bool {

    TPDSetup.setWithAppId(APP_ID, withAppKey: "APP_KEY", with: TPDServerType.ServerType)

}
Setup universal link
step 1
Go to xCode TARGET and Signing & Capabilities page
step 2
click + button and choose Associated Domains
step 3
In Associated Domains section click + button add domain
step 4
Domain should be applink:{your domain without https://}
step 5
Setup a config need to upload a file on your server. You can use ngrok to test. create a folder /.well-known in your server then create a file ‘apple-app-site-association’
appID format :
{
    "applinks": {
        "apps": [],
        "details": [
            {
                "appID": "T9G64ZZGC4.Cherri.TPDPlusPayExample",
                "paths": [ "*" ]
            }
        ]
    }
}
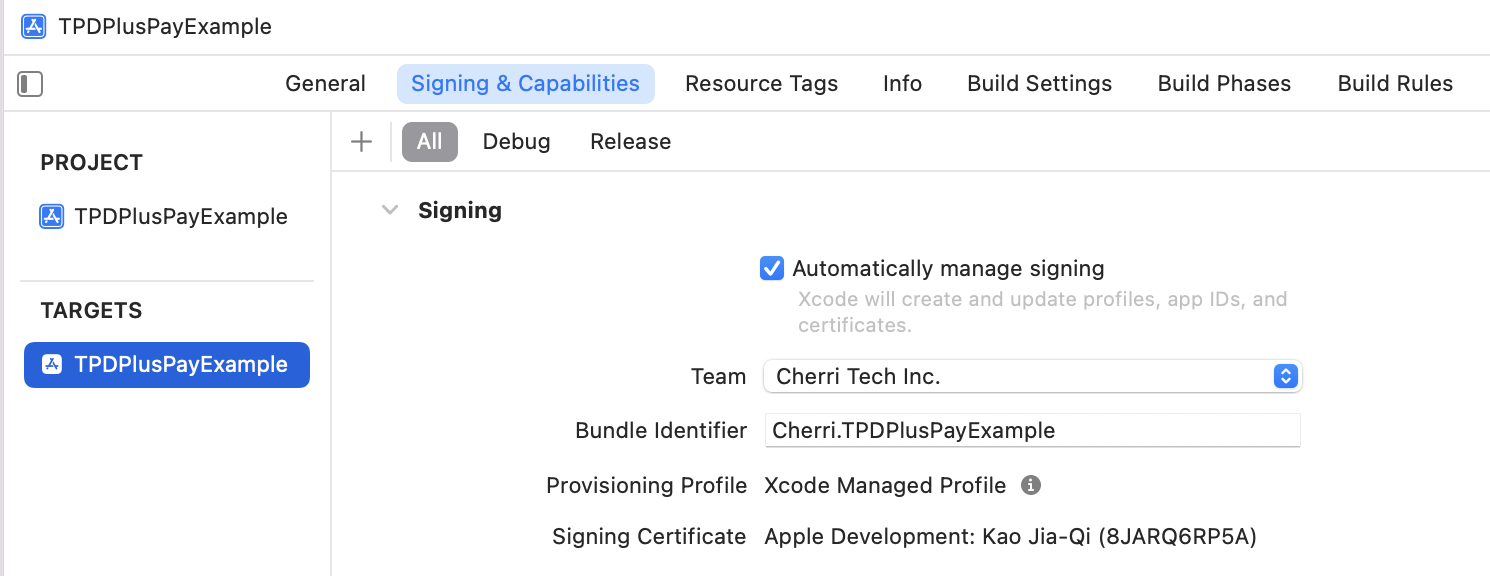
Get teamID from apple developer membership
Get bundle identifier from xCode
Setup TPDPlusPay
Use your custom universal link to initialize TPDPlusPay object.
let plusPay = TPDPlusPay.setup(withReturnUrl: "Your universal link")
Get Prime
Call getPrime function, via onSuccessCallback or onFailureCallbac to get prime or error message.
plusPay.onSuccessCallback { (prime) in
    print(prime : \(prime!))
}.onFailureCallback { (status, msg) in
    print("status : \(status), msg : \(msg)")
}.getPrime()
Redirect to Family Mart App
Obtain payment_url from TapPay, call redirect url function to Family Mart App, get Plus Pay result via callback.
plusPay.redirect(payment_url) { (result) in
    print("status : \(result.status), rec_trade_id : \(result.recTradeId), order_number : \(result.orderNumber), bank_transaction_id : \(result.bankTransactionId)")
}
Handle universal link
Use this method handle universal link come from TapPay and parse data. ( For version lower than iOS 13.0 )
- (BOOL)application:(UIApplication *)application continueUserActivity:(NSUserActivity *)userActivity restorationHandler:(void (^)(NSArray<id<UIUserActivityRestoring>> * _Nullable))restorationHandler {
    NSURL * url = userActivity.webpageURL;
    BOOL plusPayHandled = [TPDPlusPay handlePlusPayUniversalLink:url];
    if (plusPayHandled) {
        return YES;
    }
    return NO;
}
Exception handle
step1
Implement addExceptionOberver function in AppDelegate didFinishLaunchingWithOptions to handle exception.
TPDPlusPay.addExceptionObserver(#selector(tappayPlusPayExceptionHandler(notofication:)))
step2
In AppDelegate add tappayPlusPayExceptionHandler function, when exception happened receive notification.
func tappayPlusPayExceptionHandler(notofication: Notification) {

let result : TPDPlusPayResult = TPDPlusPay.parseURL(notofication)

print("status : \(result.status) , orderNumber : \(result.orderNumber) , recTradeid : \(result.recTradeId) , bankTransactionId : \(result.bankTransactionId) ")

}
PXPay Plus
1. Download and import TPDirect.framework into your project.
2. Create a Bridging-Header.h file and Import TPDirect SDK
#import <TPDirect/TPDirect.h>
3. Use TPDSetup to set up your environment.
func application(_ application: UIApplication, didFinishLaunchingWithOptions launchOptions: [UIApplicationLaunchOptionsKey: Any]?) -> Bool {

    TPDSetup.setWithAppId(APP_ID, withAppKey: "APP_KEY", with: TPDServerType.ServerType)

}
Setup universal link
step 1
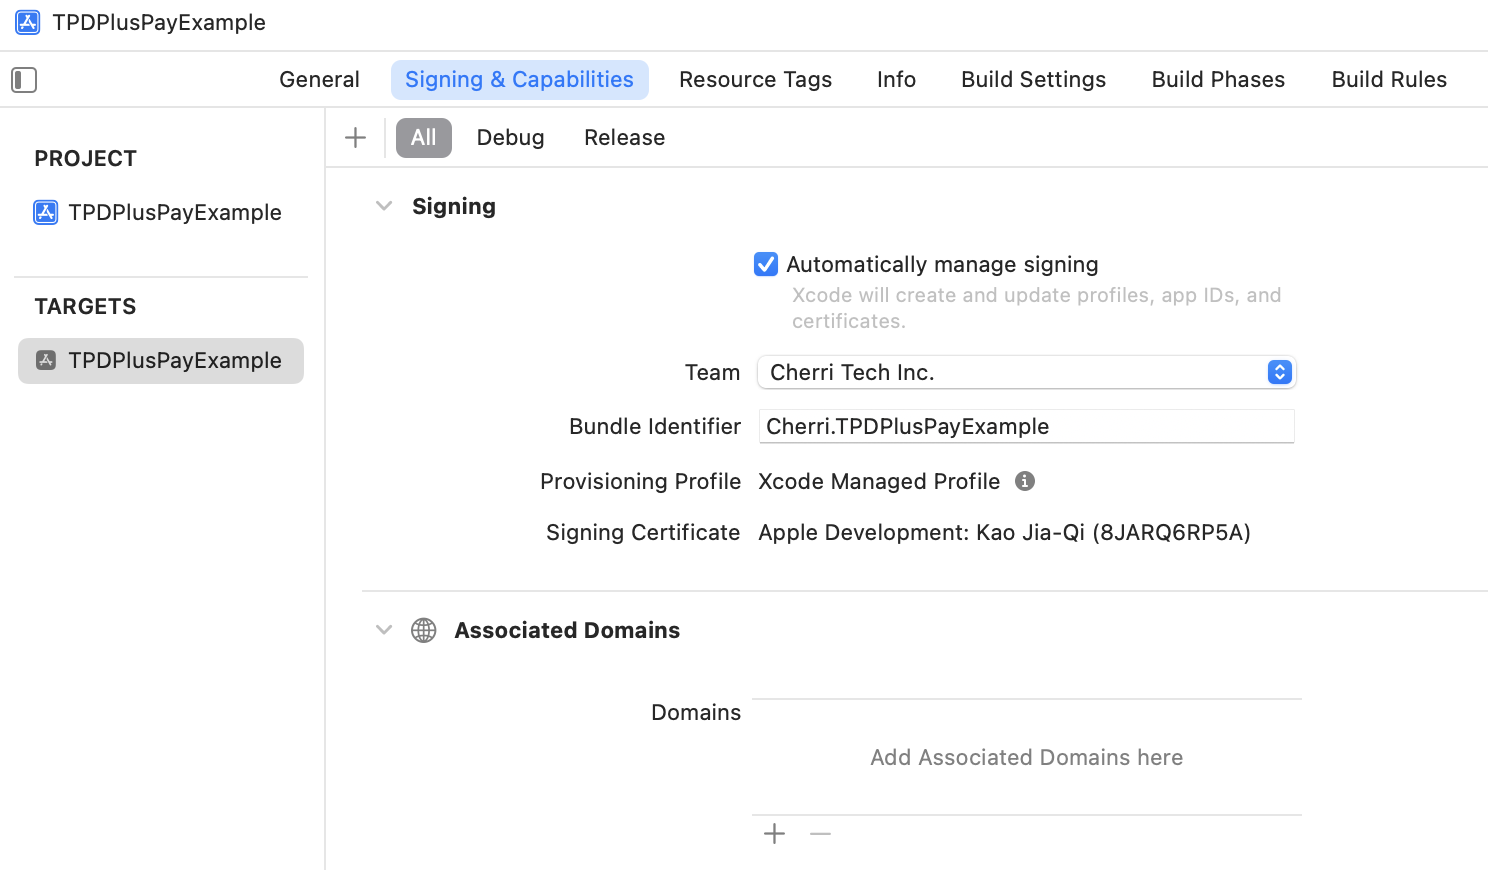
Go to xCode TARGET and Signing & Capabilities page
step 2
click + button and choose Associated Domains
step 3
In Associated Domains section click + button add domain
step 4
Domain should be applink:{your domain without https://}
step 5
Setup a config need to upload a file on your server. You can use ngrok to test. create a folder /.well-known in your server then create a file ‘apple-app-site-association’
appID format :
{
    "applinks": {
        "apps": [],
        "details": [
            {
                "appID": "T9G64ZZGC4.Cherri.TPDPxPayPlusExample",
                "paths": [ "*" ]
            }
        ]
    }
}
Get teamID from apple developer membership
Get bundle identifier from xCode
Setup TPDPxPayPlus
Use your custom universal link to initialize TPDPxPayPlus object.
let pxPayPlus = TPDPxPayPlus.setup(withReturnUrl: "Your universal link")
Get Prime
Call getPrime function, via onSuccessCallback or onFailureCallbac to get prime or error message.
pxPayPlus.onSuccessCallback { (prime) in
    print(prime : \(prime!))
}.onFailureCallback { (status, msg) in
    print("status : \(status), msg : \(msg)")
}.getPrime()
Redirect to PXPay Plus App
Obtain payment_url from TapPay, call redirect url function to PXPay Plus App, get PXPay Plus result via callback.
pxPayPlus.redirect(payment_url) { (result) in
    print("status : \(result.status), rec_trade_id : \(result.recTradeId), order_number : \(result.orderNumber), bank_transaction_id : \(result.bankTransactionId)")
}
Handle universal link
Use this method handle universal link come from TapPay and parse data. ( For version lower than iOS 13.0 )
- (BOOL)application:(UIApplication *)application continueUserActivity:(NSUserActivity *)userActivity restorationHandler:(void (^)(NSArray<id<UIUserActivityRestoring>> * _Nullable))restorationHandler {
    NSURL * url = userActivity.webpageURL;
    BOOL pxPayPlusHandled = [TPDPxPayPlus handlePxPayPlusUniversalLink:url];
    if (pxPayPlusHandled) {
        return YES;
    }
    return NO;
}
Exception handle
step1
Implement addExceptionOberver function in AppDelegate didFinishLaunchingWithOptions to handle exception.
TPDPxPayPlus.addExceptionObserver(#selector(tappayPxPayPlusExceptionHandler(notofication:)))
step2
In AppDelegate add tappayPxPayPlusExceptionHandler function, when exception happened receive notification.
func tappayPxPayPlusExceptionHandler(notofication: Notification) {

let result : TPDPxPayPlusResult = TPDPxPayPlus.parseURL(notofication)

print("status : \(result.status) , orderNumber : \(result.orderNumber) , recTradeid : \(result.recTradeId) , bankTransactionId : \(result.bankTransactionId) ")

}
iPASS MONEY
1. Download and import TPDirect.framework into your project.
2. Create a Bridging-Header.h file and Import TPDirect SDK
#import <TPDirect/TPDirect.h>
3. Use TPDSetup to set up your environment.
func application(_ application: UIApplication, didFinishLaunchingWithOptions launchOptions: [UIApplicationLaunchOptionsKey: Any]?) -> Bool {

    TPDSetup.setWithAppId(APP_ID, withAppKey: "APP_KEY", with: TPDServerType.ServerType)

}
Setup universal link
step 1
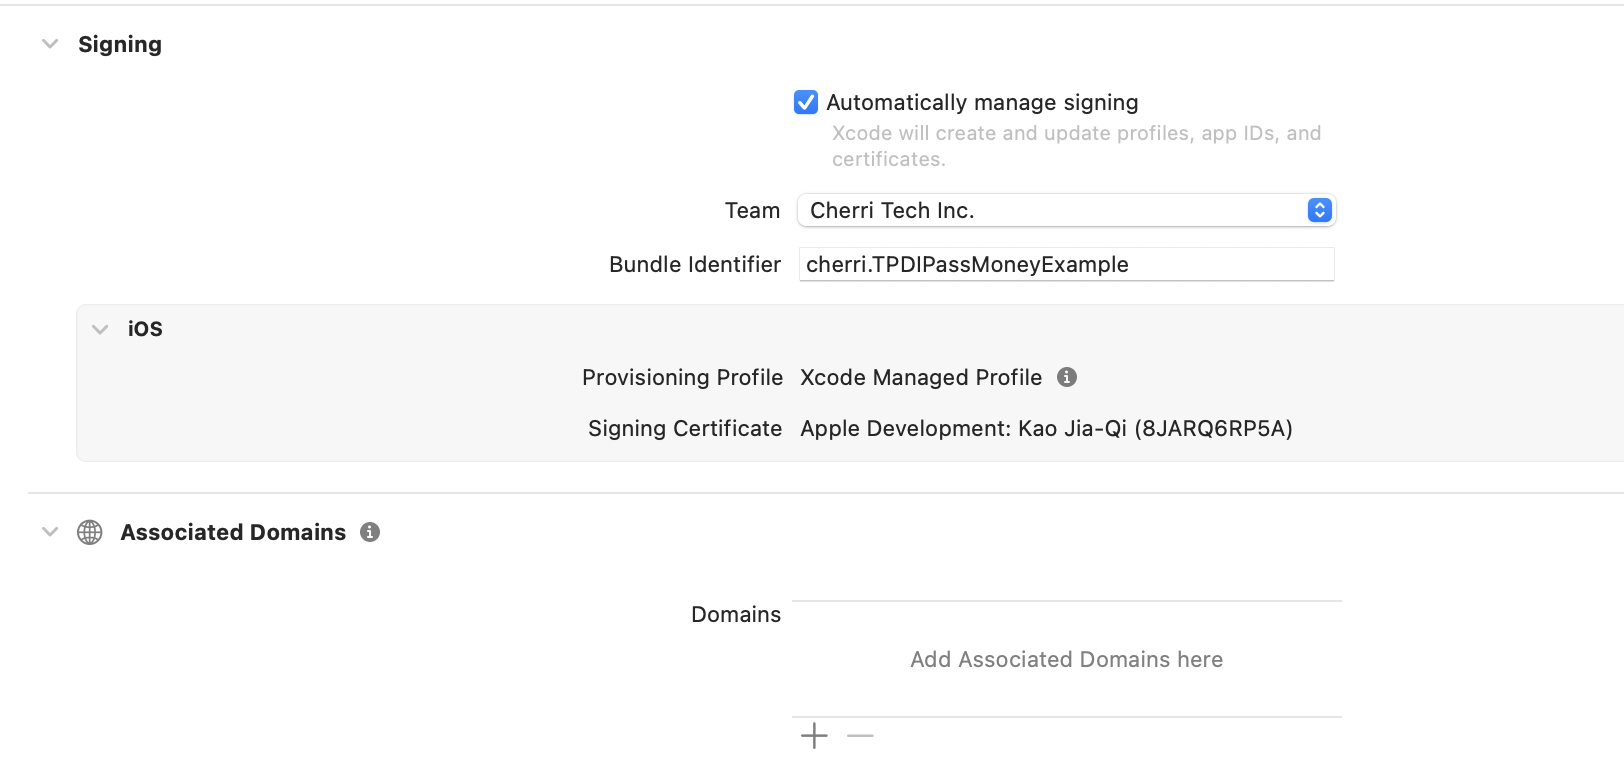
Go to xCode TARGET and Signing & Capabilities page
step 2
click + button and choose Associated Domains
step 3
In Associated Domains section click + button add domain
step 4
Domain should be applink:{your domain without https://}
step 5
Setup a config need to upload a file on your server. You can use ngrok to test. create a folder /.well-known in your server then create a file ‘apple-app-site-association’
appID format :
{
    "applinks": {
        "apps": [],
        "details": [
            {
                "appID": "T9G64ZZGC4.Cherri.TPDIPassMoneyExample",
                "paths": [ "*" ]
            }
        ]
    }
}
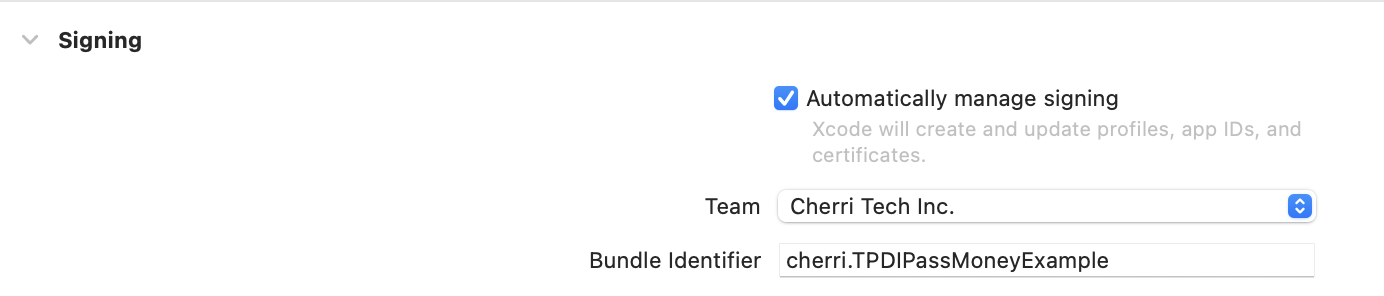
Get teamID from apple developer membership
Get bundle identifier from xCode
Setup TPDIPassMoney
Use your custom universal link to initialize TPDIPassMoney object.
let iPassMoney = TPDIPassMoney.setup(withReturnUrl: "Your universal link")
Get Prime
Call getPrime function, via onSuccessCallback or onFailureCallbac to get prime or error message.
iPassMoney.onSuccessCallback { (prime) in
    print(prime : \(prime!))
}.onFailureCallback { (status, msg) in
    print("status : \(status), msg : \(msg)")
}.getPrime()
Redirect to iPASS MONEY App
Obtain payment_url from TapPay, call redirect url function to iPASS MONEY App, get iPASS MONEY result via callback.
iPassMoney.redirect(payment_url) { (result) in
    print("status : \(result.status), rec_trade_id : \(result.recTradeId), order_number : \(result.orderNumber), bank_transaction_id : \(result.bankTransactionId)")
}
Handle universal link
Use this method handle universal link come from TapPay and parse data. ( For version lower than iOS 13.0 )
- (BOOL)application:(UIApplication *)application continueUserActivity:(NSUserActivity *)userActivity restorationHandler:(void (^)(NSArray<id<UIUserActivityRestoring>> * _Nullable))restorationHandler {
    NSURL * url = userActivity.webpageURL;
    BOOL iPassMoneyHandled = [TPDIPassMoney handleIPassMoneyUniversalLink:url];
    if (iPassMoneyHandled) {
        return YES;
    }
    return NO;
}
Exception handle
step1
Implement addExceptionOberver function in AppDelegate didFinishLaunchingWithOptions to handle exception.
TPDIPassMoney.addExceptionObserver(#selector(tappayIPassMoneyExceptionHandler(notofication:)))
step2
In AppDelegate add tappayIPassMoneyExceptionHandler function, when exception happened receive notification.
func tappayIPassMoneyExceptionHandler(notofication: Notification) {

let result : TPDIPassMoneyResult = TPDIPassMoney.parseURL(notofication)

print("status : \(result.status) , orderNumber : \(result.orderNumber) , recTradeid : \(result.recTradeId) , bankTransactionId : \(result.bankTransactionId) ")

}
Aftee
1. Download and import TPDirect.xcframework into your project.
2. Use TPDSetup to set up your environment.
func application(_ application: UIApplication, didFinishLaunchingWithOptions launchOptions: [UIApplicationLaunchOptionsKey: Any]?) -> Bool {

    TPDSetup.setWithAppId(APP_ID, withAppKey: "APP_KEY", with: TPDServerType.ServerType)

}
3. Setup Custom URL Scheme
Step 1
Go into your app’s info.plist file.
Step 2
Add a Row to this and call it “URL types”
Step 3
Expand the first item in “URL types” and add a row called “URL identifier”, the value of this string should be the reverse domain for your app e.g. “com.yourcompany.myapp”.
Step 4
Again, add a row into the first item in “URL types” and call it “URL Schemes”
Step 5
Inside “URL Schemes” you can use each item as a different url you wish to use, so if you wanted to use “myapp://” you would create an item called “myapp”.
Setup TPDAftee
Use your custom URL Scheme to initialize TPDAftee object.
TPDAftee.setup(withReturnUrl: "You Custom URL SCheme")
Get Prime
Call getPrime function, via onSuccessCallback or onFailureCallback to get prime or error message.
aftee.onSuccessCallback { (prime) in
    print(prime : \(prime!))
}.onFailureCallback { (status, msg) in
    print("status : \(status), msg : \(msg)")
}.getPrime()
Redirect to Aftee Payment Page
Obtain payment_url from TapPay, call redirect url function to Aftee Payment Page, get Aftee result via callback.
aftee.redirect("paymentUrl") { (result) in

    print("stauts : \(result.status) , recTradeId : \(result.recTradeId) , bankTransactionId : \(result.bankTransactionId) , order_number : \(result.orderNumber)")

})
Handle URL
Use this method handle URL come from TapPay and parse URL data. ( For version higher than iOS 9.0 )
func application(_ app: UIApplication, open url: URL, options: [UIApplicationOpenURLOptionsKey : Any] = [:]) -> Bool {
    let afteeHandled = TPDAftee.handle(url)
    if (afteeHandled) {
        return true
        }
    return false
}
( For version lower than iOS 9.0 )
func application(_ application: UIApplication, open url: URL, sourceApplication: String?, annotation: Any) -> Bool {
    let afteeHandled = TPDAftee.handle(url)
    if (afteeHandled) {
        return true
    }

    return false
}
Exception Handle
Step1
Implement addExceptionOberver function in AppDelegate didFinishLaunchingWithOptions to handle exception, .
TPDAftee.addExceptionObserver(#selector(tappayAfteeExceptionHandler(notofication:)))
Step2
In AppDelegate add tappayLinePayExceptionHandler function, when exception happened receive notification.
@objc func tappayAfteeExceptionHandler(notofication: Notification) {

let result : TPDAfteeResult = TPDAftee.parseURL(notofication)

    print("status : \(result.status) , orderNumber : \(result.orderNumber) , recTradeid : \(result.recTradeId) , bankTransactionId : \(result.bankTransactionId) ")

}
Cardholder
1. Import TPDirect.framework and TPDirectResource into your project.
2. Create a Bridging-Header.h file and Import TPDirect SDK
#import <TPDirect/TPDirect.h>
3. Use TPDSetup to set up your environment.
func application(_ application: UIApplication, didFinishLaunchingWithOptions launchOptions: [UIApplicationLaunchOptionsKey: Any]?) -> Bool {

    TPDSetup.setWithAppId(APP_ID, withAppKey: "APP_KEY", with: TPDServerType.ServerType)
}
4. Add UIView in your Main.storyboard and initialize TPDCardholderForm.
self.tpdCardholderForm = TPDCardholderForm.setup(withContainer: Your View)
5. Setup TPDCardholderForm Text Color
tpdCardholderForm.setErrorColor(UIColor.red)
tpdCardholderForm.setOkColor(UIColor.green)
tpdCardholderForm.setNormalColor(UIColor.black)
6. Setup TPDCardholderForm onFormUpdated Callback get TPDForm Status, check is can get prime.
tpdCardholderForm.onFormUpdated { (status) in
    if (status.isCanGetCardholderPrime()) {
        // Can make payment.
    } else {
        // Can't make payment.
    }
}
7. Setup TPDCardholderForm display email, phone number field
// Default is true.
tpdCardholderForm.setShowEmailField(false)
tpdCardholderForm.setShowPhoneNumberField(false)
8. Use the getPrime() function in TPDCardholderForm to obtain the prime token.
tpdCardholderForm.onSuccessCallback { (prime, status, message) in

    print("Prime : \(prime!), status : \(status), message : \(message)")

}.onFailureCallback { (status, message) in

    print("status : \(status) , Message : \(message)")

}.getCardholderPrime()
OPPay
1. Download and import TPDirect.xcframework into your project.
2. Use TPDSetup to set up your environment.
func application(_ application: UIApplication, didFinishLaunchingWithOptions launchOptions: [UIApplicationLaunchOptionsKey: Any]?) -> Bool {

    TPDSetup.setWithAppId(APP_ID, withAppKey: "APP_KEY", with: TPDServerType.ServerType)

}
3. Setup Custom URL Scheme
Step 1
Go into your app’s info.plist file.
Step 2
Add a Row to this and call it “URL types”
Step 3
Expand the first item in “URL types” and add a row called “URL identifier”, the value of this string should be the reverse domain for your app e.g. “com.yourcompany.myapp”.
Step 4
Again, add a row into the first item in “URL types” and call it “URL Schemes”
Step 5
Inside “URL Schemes” you can use each item as a different url you wish to use, so if you wanted to use “myapp://” you would create an item called “myapp”.
Setup TPDOpPay
Use your custom URL Scheme to initialize TPDOpPay object.
TPDOpPay.setup(withReturnUrl: "You Custom URL SCheme")
Get Prime
Call getPrime function, via onSuccessCallback or onFailureCallback to get prime or error message.
oppay.onSuccessCallback { (prime) in
    print(prime : \(prime!))
}.onFailureCallback { (status, msg) in
    print("status : \(status), msg : \(msg)")
}.getPrime()
Redirect to OPPay Payment Page
Obtain payment_url from TapPay, call redirect url function to OPPay Payment Page, get OPPay result via callback.
oppay.redirect("paymentUrl") { (result) in

    print("stauts : \(result.status) , recTradeId : \(result.recTradeId) , bankTransactionId : \(result.bankTransactionId) , order_number : \(result.orderNumber)")

})
Handle URL
Use this method handle URL come from TapPay and parse URL data. ( For version higher than iOS 9.0 )
func application(_ app: UIApplication, open url: URL, options: [UIApplicationOpenURLOptionsKey : Any] = [:]) -> Bool {
    let oppayHandled = TPDOpPay.handle(url)
    if (oppayHandled) {
        return true
        }
    return false
}
( For version lower than iOS 9.0 )
func application(_ application: UIApplication, open url: URL, sourceApplication: String?, annotation: Any) -> Bool {
    let oppayHandled = TPDOpPay.handle(url)
    if (oppayHandled) {
        return true
    }

    return false
}
Exception Handle
Step1
Implement addExceptionOberver function in AppDelegate didFinishLaunchingWithOptions to handle exception, .
TPDOpPay.addExceptionObserver(#selector(tappayOpPayExceptionHandler(notofication:)))
Step2
In AppDelegate add tappayLinePayExceptionHandler function, when exception happened receive notification.
@objc func tappayOpPayExceptionHandler(notofication: Notification) {

let result : TPDOPPayResult = TPDOpPay.parseURL(notofication)

    print("status : \(result.status) , orderNumber : \(result.orderNumber) , recTradeid : \(result.recTradeId) , bankTransactionId : \(result.bankTransactionId) ")

}