tappay-android-example
TapPay SDK example code for Android Platform.
TapPay Android SDK is used to get token(i.e. prime) on Android platform for charging a credit card.
Obtain your app id and keys here. https://www.tappaysdk.com/en
#
Usage of each pay
- Direct Pay
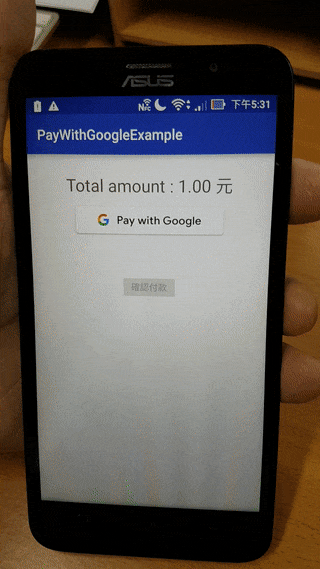
- Google Pay
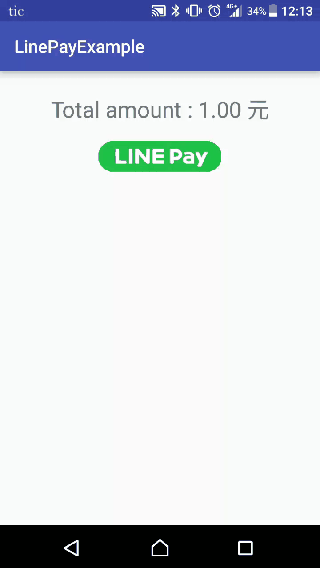
- LINE Pay
- Samsung Pay
- JKOPAY
- Easy-Wallet
- Atome
- Pi-Wallet
- Plus Pay
- PX Pay Plus
- iPass Money
- AFTEE
- OPPay
- Cardholder
#
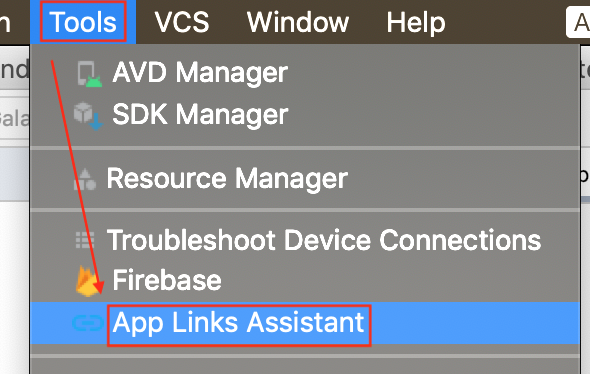
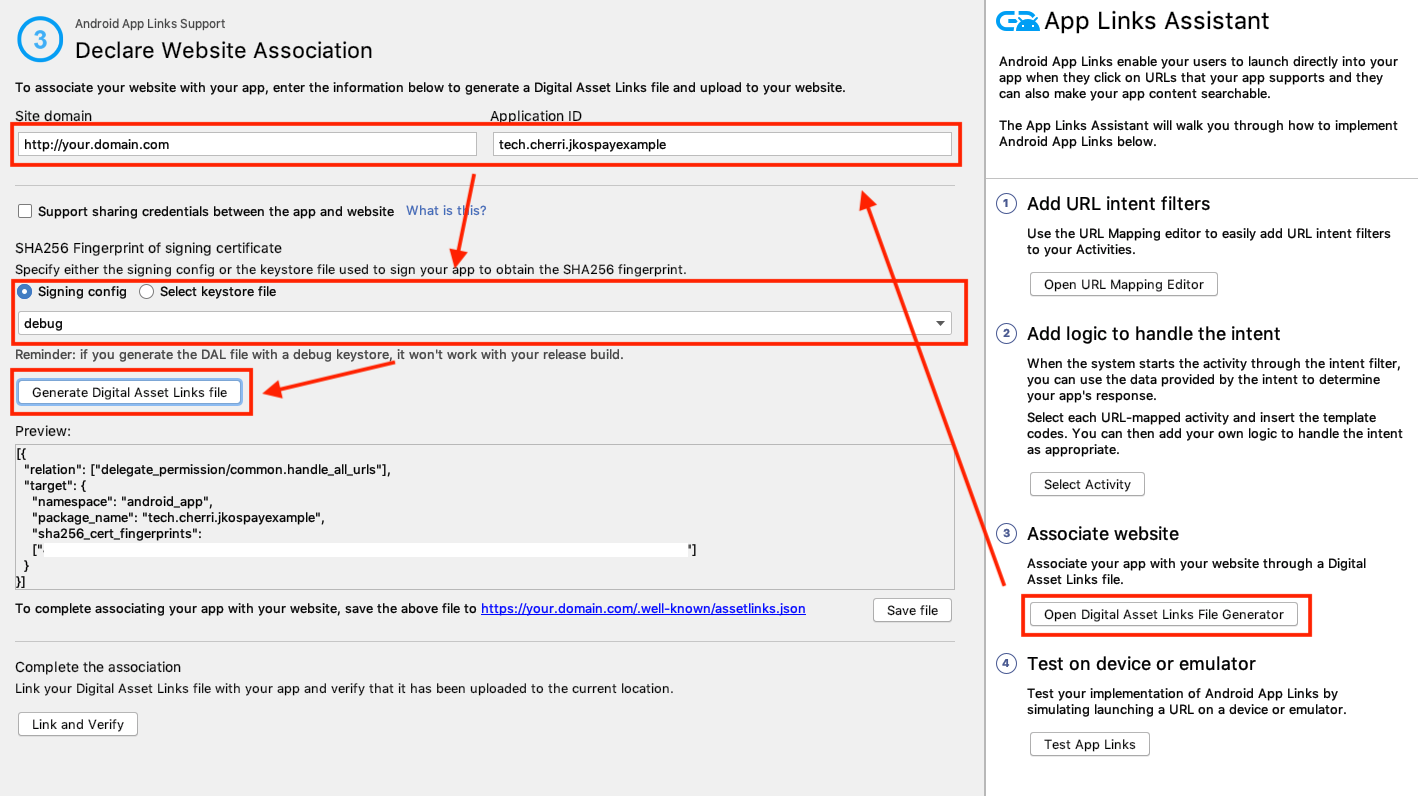
Setup Android App link in Android Studio
- Setup a config need to use an API return JSON string, API path https://”your host”/”your path”
JSON string For example:
[{ "relation": ["delegate_permission/common.get_login_creds"], "target": { "namespace": "android_app", "package_name": "your package name", "sha256_cert_fingerprints": ["your sha256_cert_fingerprints"] } }] - Android studio will generate “assetlinks.json” for you, and you need to save above file to : https://”your host”/.well-known/assetlinks.json
#
Direct Pay

- Import tpdirect.aar into your project.
- Use TPDSetup to initialize the SDK and setup environment.
TPDSetup.initInstance(getApplicationContext(), "APP_ID", "APP_KEY" , TPDServerType.Sandbox); - Add TPDForm in your layout.
<tech.cherri.tpdirect.api.TPDForm android:id="@+id/tpdForm" android:layout_width="wrap_content" android:layout_height="wrap_content"> </tech.cherri.tpdirect.api.TPDForm> -
(Option) Enable cardholder feature if you need to use cardholder info.
Enable name_en
tpdForm.setNameEnColumn(true);Enable email
tpdForm.setEmailColumn(true);Enable country_code and phone_number
tpdForm.setPhoneNumberColumn(true); - Setup TPDCard with TPDForm.
TPDCard card = TPDCard.setup(TPDForm tpdForm) .onSuccessCallback(new TPDCardGetPrimeSuccessCallback(){ @Override public void onSuccess(String prime, TPDCardInfo cardInfo) { //get Prime succeeded. } } ).onFailureCallback(new TPDGetPrimeFailureCallback(){ @Override public void onFailure(int status, String reportMsg) { //get Prime failed. } }); - Fill credit card information in TPDForm and get Prime from TapPay.
card.getPrime();
如需使用 RBA 相關功能
- 若你是使用3.9.0 版本,直接使用tpdirect.aar 即可
- 若您是使用3.9.0 之前版本,請將 /DirectPayExample/app/libs/android-A1.0.0.aar 此檔案與 tpdirect.aar 一同放置於 lib 中
#
Google Pay
- Import tpdirect.aar into your project.
- Add dependencies into your app’s build.gradle
compile 'com.android.support:appcompat-v7:24.1.1' implementation 'com.google.android.gms:play-services-wallet:19.3.0' - Add below metadata in AndroidManifest.xml
<meta-data android:name="com.google.android.gms.version" android:value="@integer/google_play_services_version" /> <meta-data android:name="com.google.android.gms.wallet.api.enabled" android:value="true" /> - Use TPDSetup to initialize the SDK and setup environment.
TPDSetup.initInstance(getApplicationContext(), "APP_ID", "APP_KEY" , TPDServerType.Sandbox); - Create :
- TPDMerchant for Google Pay process
TPDMerchant tpdMerchant = new TPDMerchant(); tpdMerchant.setSupportedNetworks(allowedNetworks); tpdMerchant.setSupportedAuthMethods(allowedAuthMethods); tpdMerchant.setMerchantName("Your merchant name"); - TPDConsumer for requiring consumer’s payment detail.
 TPDConsumer tpdConsumer = new TPDConsumer();
 tpdConsumer.setPhoneNumberRequired(true);
 tpdConsumer.setShippingAddressRequired(true);
 tpdConsumer.setEmailRequired(true);
- TPDMerchant for Google Pay process
- Setup TPDGooglePay with TPDMerchant and TPDConsumer.
TPDGooglePay tpdGooglePay = new TPDGooglePay(this, tpdMerchant, tpdConsumer); - Check Google Pay availability.
tpdGooglePay.isGooglePayAvailable(TPDGooglePayListener var1); - Obtain PaymentData.
tpdGooglePay.requestPayment(TransactionInfo.newBuilder() .setTotalPriceStatus(WalletConstants.TOTAL_PRICE_STATUS_FINAL) .setTotalPrice("1") .setCurrencyCode("TWD") .build(), LOAD_PAYMENT_DATA_REQUEST_CODE); - Get Prime from TapPay.
tpdGooglePay.getPrime(paymentData, TPDTokenSuccessCallback, TPDTokenFailureCallback);
LINE Pay
- Import tpdirect.aar into your project.
- Use TPDSetup to initialize the SDK and setup environment.
TPDSetup.initInstance(getApplicationContext(), "APP_ID", "APP_KEY" , TPDServerType.Sandbox); -
Add below intent-filter to an Activity for receiving LINE Pay Result in AndroidManifest.xml and set launch mode to “SingleTask”
For example :
<activity android:name=".LinePayActivity" android:launchMode="singleTask"> <intent-filter> <action android:name="android.intent.action.VIEW" /> <category android:name="android.intent.category.DEFAULT" /> <category android:name="android.intent.category.BROWSABLE" /> <data android:host="tech.cherri" android:scheme="linepayexample" /> </intent-filter> </activity> - Add below queries element to manifest for LINE Pay package visibility in Android 11 and later version
   <queries>
        <!-- for line pay open -->
        <package android:name="jp.naver.line.android" />
   </queries>
- Check LINE Pay availability.
boolean isLinePayAvailable =TPDLinePay.isLinePayAvailable(Context context); -
Setup TPDLinePay with uri which is formed with host and scheme(both declared in Step3).
For example:
TPDLinePay tpdLinePay = new TPDLinePay(Context context, "linepayexample://tech.cherri"); - Open corresponding LinePay payment method by paymentUrl obtained from TapPay pay-by-prime API
tpdLinePay.redirectWithUrl(paymentUrl); - Receive LinePayResult in Activity life cycle “onCreate” or “onNewIntent” (depend on the activity had been destroyed or not)
tpdLinePay.parseToLinePayResult(Context context, intent.getData(), TPDLinePayResultListener listener); - Obtain TPDLinePayResult in “onParseSuccess”
TPDLinePayResult has:
- status (0 = Success , 924 = Canceled by User)
- recTradeId
- bankTransactionId
- orderNumber
Samsung Pay

-
Import tpdirect.aar and samsungpay-1.x.jar into your project.
-
Add below meta data to your application tag in AndroidManifest.xml
For example :
<application android:icon="@mipmap/ic_launcher" android:theme="@style/AppTheme" . . .> <!--Set to 'N' if in release mode.--> <meta-data android:name="debug_mode" android:value="Y" /> <meta-data android:name="spay_sdk_api_level" android:value="1.8" /> <!--Debug Key is valid for 3 months;--> <!--Remove below metadata if in release mode--> <meta-data android:name="spay_debug_api_key" android:value=“{Your debug_api_key obtained from Samsung}” /> <activity android:name=".MainActivity"> <intent-filter> <action android:name="android.intent.action.MAIN" /> <category android:name="android.intent.category.LAUNCHER" /> </intent-filter> </activity> - Use TPDSetup to initialize the SDK and setup environment.
TPDSetup.initInstance(getApplicationContext(), "APP_ID", "APP_KEY" , TPDServerType.Sandbox); - Create TPDMerchant for Samsung Pay process
TPDMerchant tpdMerchant = new TPDMerchant(); tpdMerchant.setMerchantName(“Your Merchant Name"); tpdMerchant.setSupportedNetworks(allowedNetworks); tpdMerchant.setSamsungMerchantId(“Your SamsungMerchantId obtained from TapPay Portal”)); tpdMerchant.setCurrencyCode("TWD"); - Setup TPDSamsungPay with TPDMerchant and service Id
TPDSamsungPay tpdSamsungPay = new TPDSamsungPay({Your Activity}, "Your serviceId obtained from Samsung", tpdMerchant); - Check Samsung Pay availability.
boolean isSamsungPayAvailable =tpdSamsungPay.isSamsungPayAvailable(TPDSamsungPayStatusListener listener); - Get Prime from TapPay.
tpdSamsungPay.getPrime(itemTotalAmount, shippingPrice, tax, totalAmount, TPDTokenSuccessCallback, TPDTokenFailureCallback);
JKOPAY
- Import tpdirect.aar into your project.
- Use TPDSetup to initialize the SDK and setup environment.
TPDSetup.initInstance(getApplicationContext(), Constants.APP_ID, Constants.APP_KEY, TPDServerType.Sandbox); - Add below intent-filter to an Activity for receiving JKO Pay Result with App Link in AndroidManifest.xml and set launch mode to “SingleTask”
For example :
<activity
    android:name=".MainActivity"
    android:launchMode="singleTask">

    <intent-filter android:autoVerify="true">
        <action android:name="android.intent.action.VIEW" />

        <category android:name="android.intent.category.DEFAULT" />
        <category android:name="android.intent.category.BROWSABLE" />

        <data
            android:host="your host"
            android:pathPattern="/your path"
            android:scheme="https" />

    </intent-filter>
</activity>
- Add below queries element to manifest for JKO Pay package visibility in Android 11 and later version
   <queries>
        <!-- for jko pay open -->
        <package android:name="com.jkos.app" />
   </queries>
- Check JKO Pay availability.
boolean isJkoPayAvailable = TPDJkoPay.isJkoPayAvailable(this.getApplicationContext());
- Setup TPDJkoPay with universal links (both declared in Step3)
For example:
TPDJkoPay tpdJkoPay = new TPDJkoPay(getApplicationContext(), "your universal links"); - Open corresponding JkoPay payment method by paymentUrl obtained from TapPay pay-by-prime API
tpdJkoPay.redirectWithUrl(paymentUrl); - Receive JkoPayResult in Activity life cycle “onCreate” or “onNewIntent” (depend on the activity had been destroyed or not)
tpdJkoPay.parseToJkoPayResult(getApplicationContext(), intent.getData(), TPDJkoPayResultListener listener)
- Obtain TPDJkoPayResult in “onParseSuccess” TPDJkoPayResult has:
status
recTradeId
bankTransactionId
orderNumber
Easy-Wallet
- Import tpdirect.aar into your project.
- Use TPDSetup to initialize the SDK and setup environment.
TPDSetup.initInstance(getApplicationContext(), Constants.APP_ID, Constants.APP_KEY, TPDServerType.Sandbox); - Add below intent-filter to an Activity for receiving Easy-Wallet Result with App Link in AndroidManifest.xml and set launch mode to “SingleTask”
For example :
<activity
    android:name=".MainActivity"
    android:launchMode="singleTask">

    <intent-filter android:autoVerify="true">
        <action android:name="android.intent.action.VIEW" />

        <category android:name="android.intent.category.DEFAULT" />
        <category android:name="android.intent.category.BROWSABLE" />

        <data
            android:host="your host"
            android:pathPattern="/your path"
            android:scheme="https" />

    </intent-filter>
</activity>
- Add below queries element to manifest for easy-wallet package visibility in Android 11 and later version
   <queries>
        <!-- for easy-wallet open -->
        <package android:name="com.easycard.wallet" />
   </queries>
- Check Easy-Wallet availability.
boolean isEasyWalletAvailable = TPDEasyWallet.isAvailable(this.getApplicationContext());
- Setup TPDEasyWallet with universal links (both declared in Step3)
For example:
TPDEasyWallet tpdEasyWallet = new TPDEasyWallet(getApplicationContext(), "your universal links"); - Open corresponding Easy-Wallet payment method by paymentUrl obtained from TapPay pay-by-prime API
tpdEasyWallet.redirectWithUrl(paymentUrl); - Receive EasyWalletResult in Activity life cycle “onCreate” or “onNewIntent” (depend on the activity had been destroyed or not)
tpdEasyWallet.parseToEasyWalletResult(getApplicationContext(), intent.getData(), TPDEasyWalletResultListener listener)
- Obtain TPDEasyWalletResult in “onParseSuccess” TPDEasyWalletResult has:
status
recTradeId
bankTransactionId
orderNumber
Pi-Wallet
- Import tpdirect.aar into your project.
- Use TPDSetup to initialize the SDK and setup environment.
TPDSetup.initInstance(getApplicationContext(), Constants.APP_ID, Constants.APP_KEY, TPDServerType.Sandbox); - Add below intent-filter to an Activity for receiving Pi-Wallet Result with App Link in AndroidManifest.xml and set launch mode to “SingleTask”
For example :
<activity
    android:name=".MainActivity"
    android:launchMode="singleTask">

    <intent-filter android:autoVerify="true">
        <action android:name="android.intent.action.VIEW" />

        <category android:name="android.intent.category.DEFAULT" />
        <category android:name="android.intent.category.BROWSABLE" />

        <data
            android:host="your host"
            android:pathPattern="/your path"
            android:scheme="https" />

    </intent-filter>
</activity>
- Add below queries element to manifest for Pi-Wallet package visibility in Android 11 and later version
   <queries>
        <!-- for pi-wallet production app open  -->
        <package android:name="tw.com.pchome.android.pi" />
        <!-- for pi-wallet test app open -->
        <!--    <package android:name="tw.com.pchome.android.pi.partner" />-->
   </queries>
- Check Pi-Wallet availability.
boolean isPiWalletAvailable = TPDPiWallet.isPiWalletAvailable(this.getApplicationContext());
- Setup TPDPiWallet with Android app links
For example:
TPDPiWallet tpdPiWallet = new TPDPiWallet(getApplicationContext(), "your android app links"); - Open corresponding Pi-Wallet payment method by paymentUrl obtained from TapPay pay-by-prime API
tpdPiWallet.redirectWithUrl(paymentUrl); - Receive PiWalletResult in Activity life cycle “onCreate” or “onNewIntent” (depend on the activity had been destroyed or not)
tpdPiWallet.parseToPiWalletResult(getApplicationContext(), intent.getData(), TPDPiWalletResultListener listener)
- Obtain TPDPiWalletResult in “onParseSuccess” TPDPiWalletResult has:
status
recTradeId
bankTransactionId
orderNumber
#
Plus Pay
- Import tpdirect.aar into your project.
- Use TPDSetup to initialize the SDK and setup environment.
TPDSetup.initInstance(getApplicationContext(), Constants.APP_ID, Constants.APP_KEY, TPDServerType.Sandbox); - Specify intent-filter to an Activity for receiving Plus Pay Result with Android app links (highly recommand) in AndroidManifest.xml and set launch mode to “SingleTask”
ex:
<activity
    android:name=".MainActivity"
    android:launchMode="singleTask">

    <intent-filter android:autoVerify="true">
        <action android:name="android.intent.action.VIEW" />

        <category android:name="android.intent.category.DEFAULT" />
        <category android:name="android.intent.category.BROWSABLE" />

        <data
            android:host="your host"
            android:pathPattern="/your path"
            android:scheme="https" />

    </intent-filter>
</activity>
- Add below queries element to manifest for Plus Pay package visibility in Android 11 and later version
    <queries>
        <!-- for plus pay production app -->
        <package android:name="grasea.familife" />
        <!-- for plus pay sandbox app -->
<!--        <package android:name="tw.com.pluspay.vendor.uat" />-->
    </queries>
- Check Plus Pay availability.
boolean isPlusPayAvailable = TPDPlusPay.isPlusPayAvailable(this.getApplicationContext());
- Setup TPDPlusPay with Android app links
ex:
TPDPlusPay tpdPlusPay = new TPDPlusPay(getApplicationContext(), "your android app links"); - Open corresponding Plus Pay payment method by paymentUrl obtained from TapPay pay-by-prime API
tpdPlusPay.redirectWithUrl(paymentUrl); - Receive Plus Pay Result in Activity life cycle “onCreate” or “onNewIntent” (depend on the activity had been destroyed or not)
tpdPlusPay.parseToPlusPayResult(getApplicationContext(), data, TPDPlusPayResultListener listener);
- callback from TPDPlusPayResultListener.onParseSuceess will return following attribute if you need to show in your UI
status
rec_trade_id
bank_transaction_id
order_number
#
PX Pay Plus
- Import tpdirect.aar into your project.
- Use TPDSetup to initialize the SDK and setup environment.
TPDSetup.initInstance(getApplicationContext(), Constants.APP_ID, Constants.APP_KEY, TPDServerType.Sandbox); - Specify intent-filter to an Activity for receiving PX Pay Plus Result with Android app links (highly recommand) in AndroidManifest.xml and set launch mode to “SingleTask”
ex:
<activity
    android:name=".MainActivity"
    android:launchMode="singleTask">

    <intent-filter>
        <action android:name="android.intent.action.MAIN" />

        <category android:name="android.intent.category.LAUNCHER" />
    </intent-filter>

    <intent-filter android:autoVerify="true">
        <action android:name="android.intent.action.VIEW" />

        <category android:name="android.intent.category.DEFAULT" />
        <category android:name="android.intent.category.BROWSABLE" />

        <data
            android:host="your host"
            android:pathPattern="/your path"
            android:scheme="https" />

    </intent-filter>
</activity>
- Add below queries element to manifest for PX Pay Plus package visibility in Android 8 and later version
    <queries>
        <package android:name="com.pxpayplus.app" />
    </queries>
- Setup TPDPXPayPlus with Android app links
ex:
TPDPXPayPlus tpdPXPayPlus = new TPDPXPayPlus(getApplicationContext(), "your android app links"); - Open corresponding PX Pay Plus payment method by paymentUrl obtained from TapPay pay-by-prime API
tpdPXPayPlus.redirectWithUrl(paymentUrl); - Receive PX Pay Plus Result in Activity life cycle “onCreate” or “onNewIntent” (depend on the activity had been destroyed or not)
tpdPXPayPlus.parseToPlusPayResult(getApplicationContext(), data, TPDPXPayPlusResultListener listener);
- callback from TPDPXPayPlusResultListener.onParseSuceess will return following attribute if you need to show in your UI
status
rec_trade_id
bank_transaction_id
order_number
#
iPass Money
- Import tpdirect.aar into your project.
- Use TPDSetup to initialize the SDK and setup environment.
TPDSetup.initInstance(getApplicationContext(), Constants.APP_ID, Constants.APP_KEY, TPDServerType.Sandbox); - Specify intent-filter to an Activity for receiving iPass Money Result with Android app links (highly recommand) in AndroidManifest.xml and set launch mode to “SingleTask”
ex:
<activity
    android:name=".MainActivity"
    android:launchMode="singleTask">

    <intent-filter>
        <action android:name="android.intent.action.MAIN" />

        <category android:name="android.intent.category.LAUNCHER" />
    </intent-filter>

    <intent-filter android:autoVerify="true">
        <action android:name="android.intent.action.VIEW" />

        <category android:name="android.intent.category.DEFAULT" />
        <category android:name="android.intent.category.BROWSABLE" />

        <data
            android:host="your host"
            android:pathPattern="/your path"
            android:scheme="https" />

    </intent-filter>
</activity>
- Add below queries element to manifest for iPass Money package visibility in Android 7 and later version
    <queries>
        <package android:name="com.ipass.ipassmoney" />
    </queries>
- Setup TPDIpassMoney with Android app links
ex:
TPDIpassMoney tpdIpassMoney = new TPDIpassMoney(getApplicationContext(), "your android app links"); - Open corresponding iPass Money payment method by paymentUrl obtained from TapPay pay-by-prime API
tpdIpassMoney.redirectWithUrl(paymentUrl); - Receive iPass Money Result in Activity life cycle “onCreate” or “onNewIntent” (depend on the activity had been destroyed or not)
tpdIpassMoney.parseToIpassMoneyResult(getApplicationContext(), data, TPDIpassMoneyResultListener listener);
- callback from TPDIpassMoneyResultListener.onParseSuceess will return following attribute if you need to show in your UI
status
rec_trade_id
bank_transaction_id
order_number
#
AFTEE
- Import tpdirect.aar into your project.
- Use TPDSetup to initialize the SDK and setup environment.
TPDSetup.initInstance(getApplicationContext(), Constants.APP_ID, Constants.APP_KEY, TPDServerType.Sandbox); - Specify intent-filter to an Activity for receiving AFTEE Result with [Android deep links] in AndroidManifest.xml and set launch mode to “SingleTask”
ex:
<activity
    android:name=".MainActivity"
    android:launchMode="singleTask">

    <intent-filter>
        <action android:name="android.intent.action.MAIN" />

        <category android:name="android.intent.category.LAUNCHER" />
    </intent-filter>

    <intent-filter android:autoVerify="true">
        <action android:name="android.intent.action.VIEW" />

        <category android:name="android.intent.category.DEFAULT" />
        <category android:name="android.intent.category.BROWSABLE" />

        <data
            android:host="your host"
            android:pathPattern="/your path"
            android:scheme="https" />

    </intent-filter>
</activity>
- Open corresponding AFTEE payment method by paymentUrl obtained from TapPay pay-by-prime API
tpdAftee.redirectWithUrl(paymentUrl); - Receive AFTEE Result in Activity life cycle “onCreate” or “onNewIntent” (depend on the activity had been destroyed or not)
Following attribute if you need to show in your UI
status
rec_trade_id
bank_transaction_id
order_number
#
OPPay
- Import tpdirect.aar into your project.
- Use TPDSetup to initialize the SDK and setup environment.
TPDSetup.initInstance(getApplicationContext(), Constants.APP_ID, Constants.APP_KEY, TPDServerType.Sandbox); - Specify intent-filter to an Activity for receiving OPPay Result with [Android deep links] in AndroidManifest.xml and set launch mode to “SingleTask”
ex:
<activity
    android:name=".MainActivity"
    android:launchMode="singleTask">

    <intent-filter>
        <action android:name="android.intent.action.MAIN" />

        <category android:name="android.intent.category.LAUNCHER" />
    </intent-filter>

    <intent-filter android:autoVerify="true">
        <action android:name="android.intent.action.VIEW" />

        <category android:name="android.intent.category.DEFAULT" />
        <category android:name="android.intent.category.BROWSABLE" />

        <data
            android:host="your host"
            android:pathPattern="/your path"
            android:scheme="https" />

    </intent-filter>
</activity>
- Open corresponding OPPay payment method by paymentUrl obtained from TapPay pay-by-prime API
tpdOpPay.redirectWithUrl(paymentUrl); - Receive OPPay Result in Activity life cycle “onCreate” or “onNewIntent” (depend on the activity had been destroyed or not)
Following attribute if you need to show in your UI
status
rec_trade_id
bank_transaction_id
order_number
#
Cardholder
- Import tpdirect.aar into your project.
- Use TPDSetup to initialize the SDK and setup environment.
TPDSetup.initInstance(getApplicationContext(), "APP_ID", "APP_KEY" , TPDServerType.Sandbox); - Add TPDCardholderForm in your layout.
<tech.cherri.tpdirect.api.TPDCardholderForm android:id="@+id/tpdCardholderForm" android:layout_width="wrap_content" android:layout_height="wrap_content"> </tech.cherri.tpdirect.api.TPDCardholderForm> -
(Option) Enable cardholder columns in TPDCardholderForm if needed.
Enable email
tpdForm.setEmailColumn(true);Enable country_code and phone_number
tpdForm.setPhoneNumberColumn(true); - Setup TPDCardHolder with TPDCardholderForm.
TPDCardHolder tpdCardHolder = TPDCardHolder.setup(TPDCardholderForm tpdCardholderForm) .onSuccessCallback(new TPDGetCardHolerPrimeSuccessCallback(){ @Override public void onSuccess(String prime, TPDCardInfo cardInfo) { //get Prime succeeded. } } ).onFailureCallback(new TPDGetCardHolderPrimeFailureCallback(){ @Override public void onFailure(int status, String reportMsg) { //get Prime failed. } }); - Fill cardholder information in TPDCardholderForm and get Prime from TapPay.
tpdCardHolder.getPrime();
#
GogoPay
- Import tpdirect.aar into your project.
- Use TPDSetup to initialize the SDK and setup environment.
TPDSetup.initInstance(getApplicationContext(), Constants.APP_ID, Constants.APP_KEY, TPDServerType.Sandbox); - Specify intent-filter to an Activity for receiving GogoPay Result with [Android deep links] in AndroidManifest.xml and set launch mode to “SingleTask”
ex:
<activity
    android:name=".MainActivity"
    android:launchMode="singleTask">

    <intent-filter>
        <action android:name="android.intent.action.MAIN" />

        <category android:name="android.intent.category.LAUNCHER" />
    </intent-filter>

    <intent-filter android:autoVerify="true">
        <action android:name="android.intent.action.VIEW" />

        <category android:name="android.intent.category.DEFAULT" />
        <category android:name="android.intent.category.BROWSABLE" />

        <data
            android:host="your host"
            android:pathPattern="/your path"
            android:scheme="https" />

    </intent-filter>
</activity>
- Open corresponding GogoPay payment method by paymentUrl obtained from TapPay pay-by-prime API
tpdGogoPay.redirectWithUrl(paymentUrl); - Receive GogoPay Result in Activity life cycle “onCreate” or “onNewIntent” (depend on the activity had been destroyed or not)
Following attribute if you need to show in your UI
status
rec_trade_id
bank_transaction_id
order_number